


Star Wars Armada - NEWS !!! ONLY !!!
MosEisleyRaumhafen :: Weitere Star Wars Spiele... :: [Armada] "Flottenbasierte Raumgefechte" :: Armada News

 Star Wars Armada - NEWS !!! ONLY !!!
 Udo77 Mi 13 Aug 2014, 17:57
Erste Ankündigung von FFG

Product image not final. Pending Licensor approval.
–The Empire Strikes Back

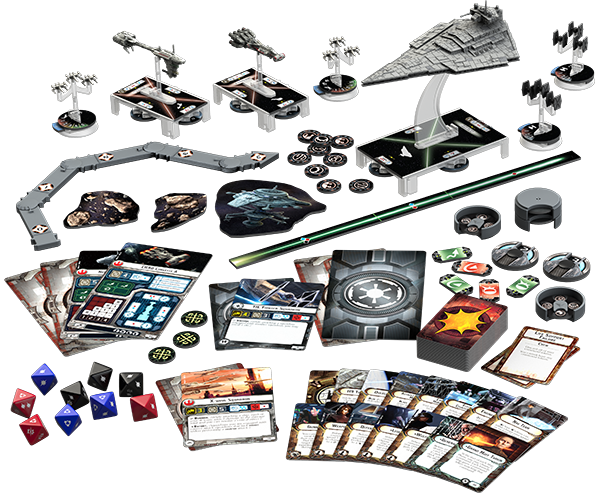
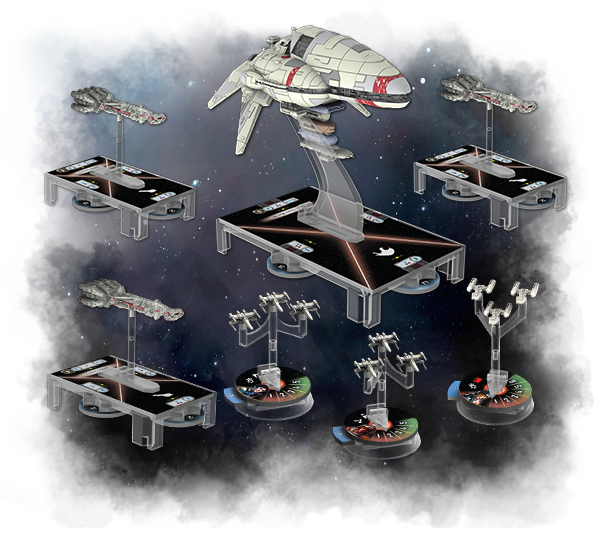
The Armada Core Set contains ten unpainted squadrons, three pre-painted capital ships, nearly one hundred cards, an innovative maneuver tool, a range ruler, six command dials, nine custom attack dice, and all the tokens that you need to engage the enemy and battle for the fate of the galaxy!

The game’s unique maneuver tool. (Product image not final. Pending Licensor approval.)
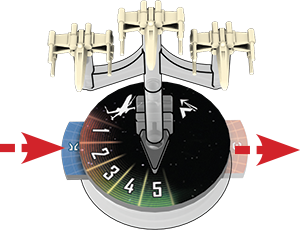
Using the game’s unique maneuver tool, a Rebel player plots a “3” speed maneuver for his Nebulon-B escort frigate
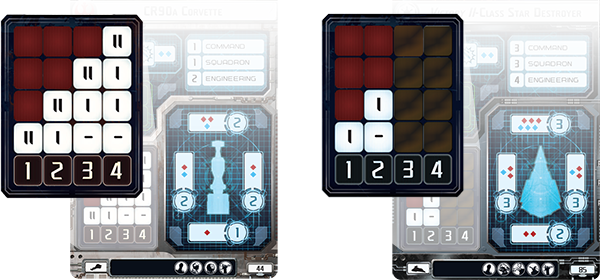
The speed chart for the CR90 (left) alongside that of the Victory-class Star Destroyer (right).
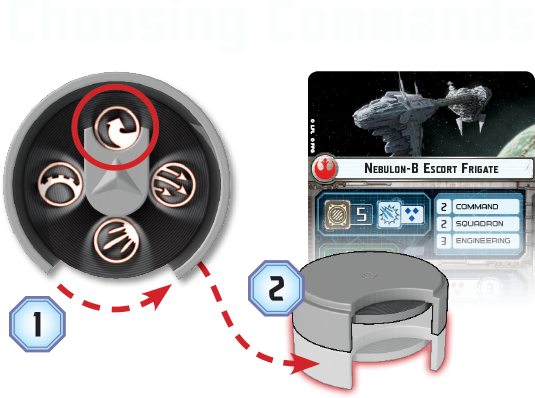
A Rebel player selects a command for his Nebulon-B escort frigate by framing it within his command dial’s fastener (1). Then, he places it at the bottom of his command stack, to be revealed in a future round (2).

Ships are all divided into four sections, each of which has its own firing arc, shield rating, and attack value. Here, we see a Victory-class Star Destroyer presented next to its base.

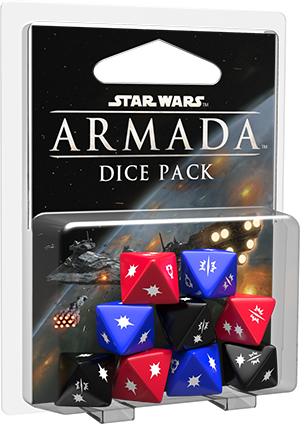
Each of the game’s attack dice presents a different effective range and spread of possible results
|

Objective cards challenge you to adapt your tactics in each battle

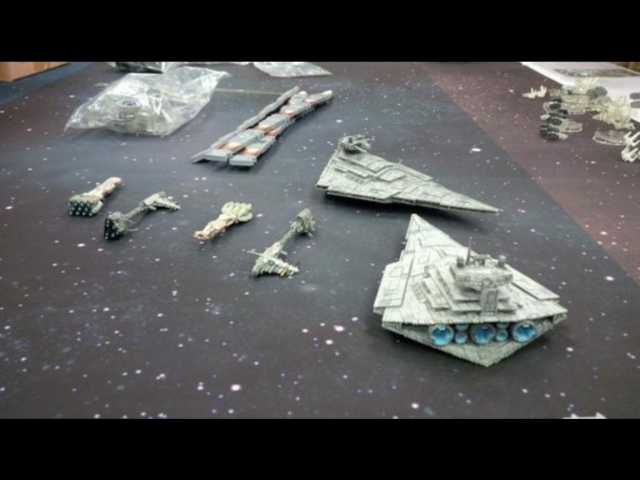
An Imperial fleet heads to battle, led by a pre-painted Victory-class Star Destroyer

Udo77- Kriegsheld des MER

Re: Star Wars Armada - NEWS !!! ONLY !!!
Quexxes Fr 15 Aug 2014, 00:12
Test-Spiel von Team Covenant
_________________
Team:sternendingsbumsgedönsdestodes
Squad- & Turnier-Liste / MFL-Rangliste / Infos / Zeitpläne / Manöver-Übersicht /...
Quexxes- Einwohner des MER
-

Re: Star Wars Armada - NEWS !!! ONLY !!!
Udo77 Do 28 Aug 2014, 01:19
* Die grossen Schiffe aus der Grundbox kann man auch einzeln und mit neuen Karten kaufen. Deswegen brauch man keine weitere Grundbox kaufen
* Rebell Fighter Squadron mit 8 Schiffsbasen: A, B, X, Y Wings
* Imperial Fighter Pack 8 Basen: Tie Fighter, Tie Advanced, Interceptor, Bomber
Die Erweiterungen sollen um die 2 Monate nach der Grundbox kommen.
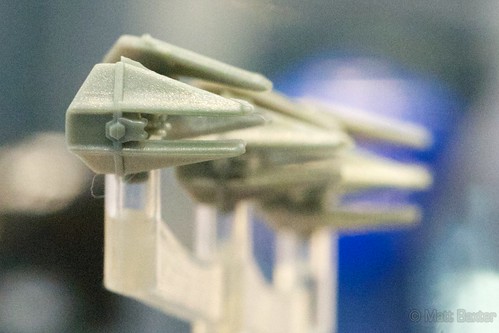
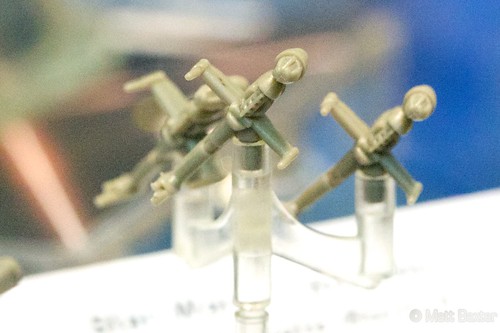
Flickr Gallery mit Detailbildern

Udo77- Kriegsheld des MER
Re: Star Wars Armada - NEWS !!! ONLY !!!
Barlmoro Fr 26 Sep 2014, 17:49

Barlmoro- Boarding Team Mos Eisley

Re: Star Wars Armada - NEWS !!! ONLY !!!
Udo77 Fr 26 Sep 2014, 19:53

Mit diesen Mini-Kommandorädern stellt man seine Befehle ein. Diese werden aufeinandergestapelt in Höhe des Kommandowertes des Schiffes. Die Nebulon-B hier hat einen Kommandowert von 2. In der Kommandophase wird ein Befehl unter den Stapel geschoben. In der folgenden Schiffsphase wird das oberste Kommandorad aufgedeckt.

Die eingestellten Befehle werden also erst mit einer Verzögerung von bis zu mehreren Runden ausgeführt. Bei der Victory II sind es 2 Runden nach der jetzigen.
Das aufgedeckte Kommando kann man entweder sofort ausführen für einen starken Effekt. Oder man kann sich einen entsprechenden Marker geben. Dieser Marker kann zu einem beliebigen späteren Zeitpunkt ausgegeben werden, der Effekt ist aber dafür schwächer. Für den maximalen Effekt kann man einen Marker (aus einer vorherigen Runde) mit dem Kommando aus der jetzigen Runde kombinieren.
Die maximale Anzahl an Markern wird ebenso durch den Kommandowert des Schiffes angegeben. Von jedem Markertyp aber nur eins. Man kann mehrere Marker in einer Runde ausgeben.

Beispiel:
 mit dem "Feuer konzentrieren" kann man mit dem Kommandorad einen zus. Würfel werfen. Mit dem "Feuer konzentrieren" Marker kann man einen Würfel neu würfeln.
Der Spieler würfelt hier normal. Dann nimmt er sich mit dem Rad einen zus. Würfel. Der ist blank, also gibt er den Marker aus (der aus einer vorherigen Runde stammt) um diesen neu zu würfeln. Doppeltreffer!
Andere Befehle:
 Navigieren
Rad: Geschwindigkeit um 1 erhöhen oder senken bis min. 0. Zusätzlich kann die "Manöverschlange" bei einem Gelenk um 1 Raster weitergestellt werden.
Marker: nur Geschw. verändern.
 Staffel:
Rad: Sofort Staffeln in kurzer und mittlerer Reichweite aktivieren. Anzahl: Staffelwert des kapitalen Schiffes. KStaffel kann bewegen und schiessen.
Marker: nur 1 Staffel
(ich denke das ist eine zus. Aktivierung)
 Reparieren:
Rad: du bekommst "Ingenieurspunkte" in Höhe des "Ingenierwertes"
1 Punkt: 1 Schild transferieren
2 Punkte: 1 Schild regenerieren
3 Punkte: 1 Schadenskarte ablegen
Marker: Du bekommst nur die halbe Anzahl an Punkten.
Bemerkung: Rad und Marker zusammen resultieren in 150% der Punkte.
Zuletzt von Udo77 am Sa 11 Okt 2014, 11:08 bearbeitet; insgesamt 1-mal bearbeitet
Udo77- Kriegsheld des MER
Re: Star Wars Armada - NEWS !!! ONLY !!!
Udo77 Sa 11 Okt 2014, 10:54
Die wichtigsten Infos übersetzt:
Spieldauer: 6 Runden mit je 4 Phasen
Nochmal die Betonung, daß große Schiffe mächtig, aber träge sind, und wie bei der vorherigen Vorschau gezeigt kann ein Angriff dass Ergebnis von 3 oder 4 Runden Planung sein.
Heute schauen wir auf die Schiffsphase und den Kampf Schiff gegen Schiff.
Die Schiffsphase
Nachdem man alle Kommandos ausgewählt hat und sie unter den Kommandostapel gelegt hat kommt die Schiffsphase. Die Spieler aktivieren nacheinander abwechselnd immer ein Schiff.
Ein Schiff, dass noch nicht aktiviert wurde, wird jetzt aktiviert mit den 3 Schritten: Kommandorad aufdecken, Angriff, Manöver ausführen.
1. Kommandorad aufdecken
Vom ausgewählten Schiff wird das oberste Rad des Kommandostapels aufgedeckt und neben das Schiff gelegt.

Der Imperiumsspieler enthüllt ein Navigationskommando oben vom Stapel eines Victory I Sternenzerstörers
2. Angriff
Nach aufdecken des Kommandorades kann das Schiff bis zu zwei Angriffe ausführen. Jeder Angriff muß aber von einem anderen Feuerwinkel stammen. Jeder Angriff kann als Ziel eine Trefferzone eines gegnerischen Schiffes haben, oder ein oder mehrere Staffeln als Ziel haben.
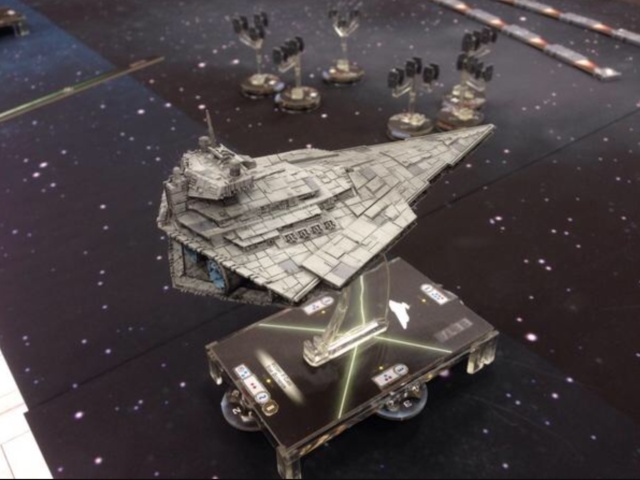
Kaum etwas ist so tödlich oder angsteinflössend wie der direkte Beschuß eines Imperialen Sternenzerstörers!
3. Manöver ausführen
Nach dem Angriff führt das Schiff sein Manöver aus. Man vewendet das bewegliche Manöverwerkzeug. Man muß die Entfernung fliegen, die der momentanen Geschwindigkeit entspricht, festgehalten auf dem Geschwindigkeitsrad.
Die Bewegung hängt von der Geschwindigkeit ab. Auf der Schiffskarte kann man anhand einer Tabelle ablesen, welches Gelenk man wie viele Schritte knicken darf. Der einzige Weg die Geschwindigkeit zu ändern ist durch das Ausführen eines Navigationskommandos.
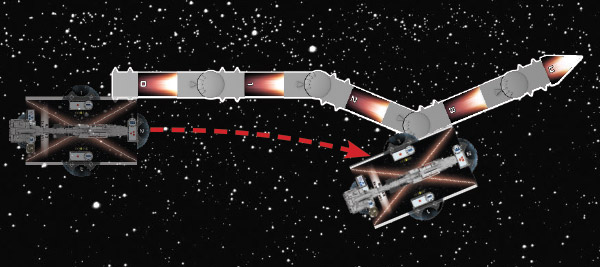
Hier eine Nebulon-B Fregatte mit einem Manöver mit Geschwindigkeit 4. Das zweite Gelenk wurde um einen Klick nach rechts gebogen, das dritte Gelenk um 2 Klicks nach Links.
(Anmerkung von mir: sieht eher nach Geschwindigkeit 3 aus. Wahrscheinlich ein Tippfehler von FFG)
Nachdem das Manöver ausgeführt wurde, wird das Kommandorad aufgedeckt auf die Schiffskarte gelegt. Der Gegner aktiviert dann ein Schiff.
Maximale Feuerkraft
Wie erwähnt kann man pro Aktivierung bis zu zwei mal Angreifen, und es ist entscheidend das Maximum dabei herauszuholen.
Die Angriffsstärke wird durch den Würfelpool der Angriffswürfel dargestellt. Es gibt drei Arten von Anggriffswürfeln in verschiedenen Farben mit je 8 Seiten. Jeder entspricht einer anderen max. Feuerreichweite, wie auf der Entfernungsschablone abzulesen ist.

Alle Würfel können auf kurze Reichweite feuern, aber nur die roten auf lange Reichweite

Rote Würfel haben die größte Reichweite, sie sind aber am wenigsten treffsicher. Nur 5 Seiten haben Treffer (
 ) oder kritische Treffer (
 ), obwohl nur 2 Seiten blank sind. Die letzte Seite hat ein Treffsicherheitssymbol (
 ). Dieses kann benutzt werden um die gegnerische Verteidigung zu entfernen.
Blaue Würfel haben die zweitgrösste Reichweite und sind die treffsichersten. Sie haben keine blanken Seiten. Ihre Seiten zeigen Treffer, kritische Treffer und Treffsicherheit.

Schwarze Würfel haben kurze Reichweite und verteilen den meisten Schaden. Sie haben zwei blanke Seiten, dafür haben sie Seiten mit kombinierten Treffern und kritischen Treffern.
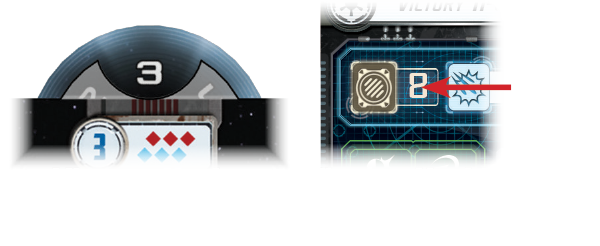
Bei Angriffen gegen gegn. Schiffe hängen die Würfel davon ab, von welchem Feuerwinkel/Hüllenzone man feuert. Bei Angriffen gegen Staffeln / Jäger gibt es einen anderen Würfelpool. Jedes Schiff hat eine Flugabwehrbewaffnung, das auf der Schiffskarte rechts neben dem Hüllenwert steht. Gegen Staffeln wird dieser Pool benutzt, unabhängig vom verwendeten Feuerwinkel.
Die Flugabwehrbewaffnung. Obwohl der Victory II Sternzerstörer im vorderen Feuerwinkel einen Primärangriff von 6 Würfeln hat, hat die Flugabwehr nur 1 blauen Würfel.
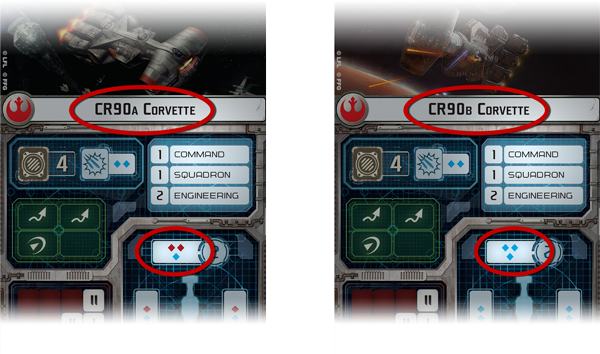
Es ist auch erwähnenswert, dass verschiedene Schiffsausführungen unterschiedliche Bewaffnungen und Würfelpools haben können. Beispiel:
CR90a: 2 rote + 1 blaue im vorderen Winkel
CR90b: 3 blaue im vorderen Winkel
Strategische Überlegungen, in welcher Reichweite man angreift. Beispiel:

1. Auf langer Reichweite muss die Victory I kein Gegenfeuer befürchten, greift aber nur mit 3 roten an.
2. Auf kurze Reichweite kann die Victory I mit 3 roten und 3 schwarzen Angreifen, muß aber Gegenfeuer von 3 blauen befürchten.
Energie auf die vorderen Deflektorschilde umleiten
Jede Hüllenzone hat einen Schildwert.
Schildrad und Hüllenwert einer Victory II
Treffer gegen eine Hüllenzone ohne Schild gehen auf die Hülle. Wenn das Schiff Schaden in Höhe seines Hüllenwertes auf der Schiffkarte erreicht wird es zerstört.
Um das zu verhindern gibt es verschiedene Verteidigungsmarker:
 Umleiten: Treffer auf die Schilde einer benachbarten Zone leiten.
 Ausweichen: Auf lange Reichweite wird ein Angriffwürfel negiert. Auf mittlere Reichweite muß der Gegner 1 Würfel neu würfeln. Auf kurze Reichweite gibt es keinen Effekt.
 Halber Schaden: Schaden wird halbiert, aufgerundet.
Ein ausgegebener Verteidigungmarker ist verbraucht und wird auf die rote Seite gedreht.

Es ist möglich einen verbrauchten Marker zu verwenden, aber dann wird er ganz vom Spiel entfernt und ist für den Rest des Spieles nicht mehr verfügbar.
Bemerkung: Ein Schiff kann nicht während eines Angriffs repariert werden, sondern nur wenn es aktiviert wird.
Auszug aus den Regeln herunterladen

Beispielangriff (PDF)
Udo77- Kriegsheld des MER
Re: Star Wars Armada - NEWS !!! ONLY !!!
Udo77 Di 21 Okt 2014, 14:15


Quelle
Udo77- Kriegsheld des MER
Re: Star Wars Armada - NEWS !!! ONLY !!!
Udo77 Sa 25 Okt 2014, 08:35
“That is the system. And I’m sure Skywalker is with them. Set your course for the Hoth system.”
–Darth Vader
The Star Destroyers are on their way. Star Wars™: Armada is coming!
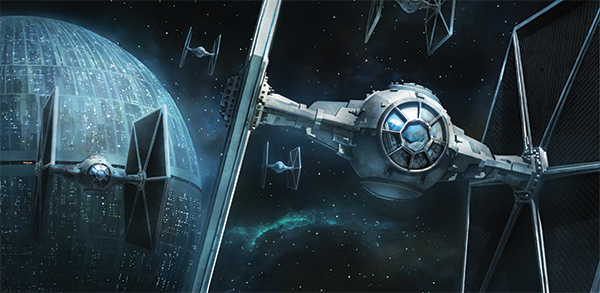
Imperial Star Destroyers and TIE squadrons go head to head with Rebel corvettes, frigates, and X-wings in this epic miniatures game of tactical fleet battles.
In our first previews, we’ve seen how Armada clearly differentiates its massive and explosive battles from the sort of lethal, fast-paced skirmishes waged between fighter squadrons. We explored the ways that the game’s command stacks add personality to the game’s different ships and force you to plan for the future. Then, we took a closer look at how your capital ships can attack your enemies, and we identified the different defenses they can use against incoming fire.
Today, we look at how your ships make use of the game’s unique maneuver tool and how they interact with obstacles. We’ll also address some of the tactical implications that follow.
Hit and Run
In Armada, your capital ships both attack and move during the Ship Phase. To review, once you enter the Ship Phase, you and your opponent take turns activating your ships, starting with the player who has initiative. When you activate a ship, you reveal its command dial, perform up to two attacks, and then move.
Reveal Command Dial
Attack
Execute Maneuver
Among other things, this means that you’re always setting your course to set yourself up for the next round’s attack, rather than setting a course to set yourself up for an attack in the same round. Accordingly, you have to consider where your opponent’s ships have already moved, where the unactivated ships are likely to move, and which ships are likely to activate first in the coming round. It doesn’t do you any good to line up all your guns at a single enemy ship if your opponent will just choose to have it activate first, attack you at close range, and then fly away.
That said, you’ll always have a good idea of your opponent’s possible courses. You both use the same maneuver tool, your opponent’s ships have speed charts that are open information you can reference at any time, and each ship in the game has its current speed visibly locked into its speed dial. What you won’t know until your opponent activates a ship is whether or not that ship has been assigned the navigation command and can adjust its speed and bearing more than the open information would suggest.
The game’s unique maneuver tool. (Product image not final. Pending Licensor approval.)
Thus, the game’s movement is yet another element that plays into the importance of making far-sighted, tactical commands. When you set your ship’s course, even though you know the exact location of every ship on the battlefield, you are never lining up an immediate attack. Instead, you are always anticipating the future, taking your best guess at how the battle will look by the time your ship next activates.
Charting Your Course
To set a ship’s course, you begin by resetting the maneuver tool so that all of its joints are straight. Then your ship’s speed indicates how far it will travel along the maneuver tool. At each joint, you can click the tool left or right a number of times away from the center position as indicated by your ship’s speed chart.
The speed charts for the CR90 corvette (left) and the Victory II-class Star Destroyer (right).
Each column on the speed chart corresponds to the speed number at the bottom of the column and shows the number of times that each joint can be clicked while your ship travels at that speed.
The rows on your ship’s speed chart correspond to the joints on the maneuver tool. The row directly above the speed number relates to the first joint, the second row relates to the second joint, and so forth. An “I” indicates that the joint can be clicked once in either direction, while an “II” means it can be clicked twice. Meanwhile, a “–” means the maneuver tool must remain straight at that joint. Of course, if you have revealed a navigate command, you can choose to adjust one of the maneuver joints by an additional click.

A Rebel player plots a “3” speed maneuver for his Nebulon-B escort frigate, adjusting the second joint one click to the right and adjusting the third joint two clicks to the left.
When you set your ship’s course, you are allowed to use the maneuver tool to measure your ship’s possible positions before you commit to the move.
Flying Through Obstacles
“Asteroids do not concern me, Admiral. I want that ship, not excuses.”
–Darth Vader
There may be times that your relentless pursuit of your foes may lead you into obstacles, and there may be times that your opponent’s superior firepower may prompt you to seek cover. In either case, it’s handy to understand how Armada deals with obstacles and collisions.
There are three types of obstacles in the Armada Core Set: asteroid fields, debris fields, and space stations. Each interacts with your capital ships and squadrons in a different fashion.

Asteroid Field
A ship that moves overlaps this obstacle receives one faceup damage card. Squadrons are unaffected.
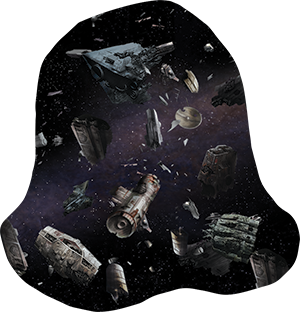
Debris Field
A ship that overlaps this obstacle suffers two damage on any hull zone. Squadrons are unaffected.

Station
At the end of a ship’s movement, if it overlaps a station, it may discard one of its faceup or facedown damage cards. At the end of a squadron’s movement, if it overlaps the station, it may recover one hull point.
Additionally, obstacles can obstruct attacks, as can capital ships.
In our last preview, we showed how you build a pool of dice for each your ship’s attacks based on the hull zone from which it’s firing, the range at which it’s firing, and whether or not you have revealed the concentrate fire command to add a die. However, obstacles and capital ships that fly between your ship and its target can also impact your dice pool.
Not only must your target be within the range and firing arc of the hull zone from which you choose to launch your attack, you must have line of sight to the hull zone you want to target. To determine whether or not you have line of sight, you trace a straight line from your hull zone’s yellow targeting point to the targeting point of the defending hull zone. If this line is traced through any hull zone on the defending ship other than the defending hull zone, you do not have line of sight to that hull zone and must declare another target. If you do not have another valid target, you lose the opportunity to perform the attack.
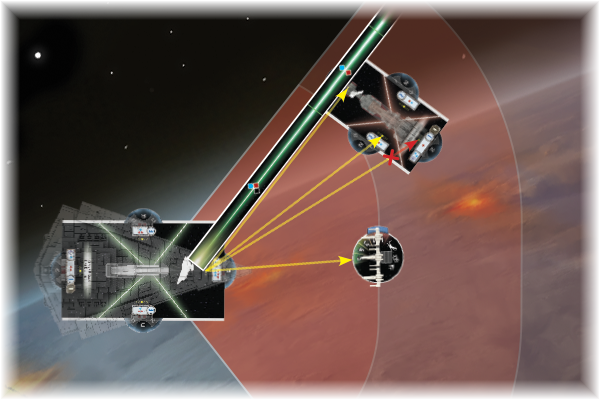
From the Star Destroyer’s front hull zone, the Imperial player has clear line of sight to the Rebel player’s X-wing squadron, as well as the CR90’s front and left hull zones. However, the Star Destroyer does not have a valid shot at the CR90’s rear hull zone since the line of sight first passes through the CR90’s left hull zone.
If you have line of sight, but that line traces across another ship or an obstacle, your attack is obstructed. Whenever your ship is obstructed, you roll one less die of your choice.

The Star Destroyer’s attacks are obstructed against the X-wing squadron and the lower CR90.
Naturally, this presents keen admirals a wide range of tactical options. As they try to take flanking positions, weaker Rebel ships may race around obstacles so that the more powerful Imperial Star Destroyers cannot find unobstructed attacks. Alternatively, an Imperial player, knowing that his opponent will want to focus fire on a damaged Star Destroyer, may commit other Star Destroyers to position between the Rebel fleet and their intended target. In this way, even though the Imperial player loses a die from his damaged Star Destroyer’s attack, that loss might just be one of six dice, whereas the Rebel player is likely to have each of its attacks cut by a third.
Collisions
While you follow one set of rules whenever your ship overlaps an obstacle, you follow another set of rules whenever your ship would collide with another ship or one or more starfighter squadrons.
First of all, it’s worth remembering that you always have the opportunity to measure your movement before you move. Thus, if your initial course would force your ship to overlap another ship or squadron, you can adjust your course. However, in some circumstances, you may still find it impossible to avoid a collision, or you may find it advantageous to ram into your opponent’s ship.

When the Rebel player sees that the course he wanted to set for his CR90 corvette would cause it to overlap the Imperial player’s Star Destroyer, he can either adjust the maneuver tool at its first two joints or suffer the consequences of the collision.
Whenever your ship’s final position would overlap another ship, it cannot finish its movement normally. Instead, you temporarily reduce its speed by one increment and attempt to execute your ship’s movement at the reduced speed. If reducing your ship’s speed by one still wouldn’t permit a legal movement, you continue to decrease your speed by one increment and attempt to move until your ship can legally finish its movement or until its speed is temporarily reduced to “0,” in which case it does not move.
After resolving this movement, your ship and the closest ship that it overlapped both receive one facedown damage card.

The Rebel player decides to have his CR90 corvette collide with the Imperial player’s Star Destroyer. He reduces the corvette’s speed by one so that both ships have clear shots at each other from their front hull zones, and then both ships suffer one facedown damage.
On the other hand, if your ship’s final position would cause it to overlap one or more squadrons, you complete your ship’s movement normally and move any overlapped squadrons out of the way. Then, your opponent places all of the overlapped squadrons next to your ship so that their bases are touching its base.
Move to Attack Position
“They’re moving to attack position!”
–Captain Needa
Movement in Armada isn’t just a matter of picking a part of the battlefield and flying to it. It’s all a part of the flow of battle. You have tactical options at every turn, and it’s up to you, fleet admiral, to make the most of them, turning the battle in your favor.
Next: We look at the rules for squadrons and the role they play in your fleet!
Udo77- Kriegsheld des MER


Udo77- Kriegsheld des MER
Re: Star Wars Armada - NEWS !!! ONLY !!!
Udo77 Sa 06 Dez 2014, 10:54
“The Empire doesn’t consider a small one-man fighter to be any threat, or they’d have a tighter defense. An analysis of the plans provided by Princess Leia has demonstrated a weakness in the battle station.”
–General Jan Dodonna
There’s no denying the raw power of the Star Wars galaxy’s capital ships. Many of them are massive war machines that can exceed a kilometer in length, their crews can number in the thousands, and the largest of them boast enough firepower to cower entire star systems. Still, the Star Wars movies remind us that there’s always room – even a need – for personal heroics. There’s always the chance that a single starfighter pilot can turn the tide of battle.
Accordingly, even though they’re dwarfed by the capital ships they accompany, starfighters and their pilots play a critical part in the tactical fleet battles of [url=http://www.fantasyflightgames.com/edge_minisite.asp?eidm=270&enmi=Star Wars: Armada]Star Wars™: Armada[/url].
In our earlier previews, we focused primarily on the game’s capital ships. We looked at how their command values and command stacks force you to plan ahead, we looked at how capital ships battle, and we looked at how they fly along the table. Today, though, we turn our attention to the game’s starfighters, looking at the how they function within the game and looking, also, at how even a single starfighter squadron can turn the tide of battle.
The Squadron Phase
Squadrons move according to a set of rules that is entirely different than that utilized by the game’s capital ships, and though their attacks work similarly, they use the distance side of the game’s range ruler, rather than the range side. The differences between squadrons and ships are further reinforced by the fact that squadrons also have their own phase within the game. After you and your opponent have activated all of your capital ships in the Ship Phase, you proceed to the Squadron Phase.
In the Squadron Phase, you and your opponent take turns activating any squadrons that were not already activated by a Squadron command during the Ship Phase. Each squadron that activates during this phase may either move or attack, but cannot do both.
The player who has initiative goes first. He chooses one of his unactivated squadrons and activates it:
* If he chooses to move his squadron, he utilizes the range ruler, placing it on the table so that its distance side is faceup, with the distance “1” end of the ruler touching any part of the base of his squadron. Then, he picks up the squadron and places it at any point along the ruler, so long as its base does not extend beyond the maximum speed indicated on its squadron card.

An X-wing squadron has a speed of three, meaning it can move up to distance “3” in any direction from its original starting point.
If he chooses to attack with his squadron, he can target any enemy ship at distance “1.” Any squadron that attacks can use all the dice indicated on its squadron card, but they ignore all
results.
The X-wing squadron begins its activation within distance “1” of a Victory-class Star Destroyer, meaning the Rebel player can activate it to attack.
After the active player finishes activating his squadron, he must activate a second unactivated squadron, if able. Then his opponent activates two of his own squadrons in the same way. This process continues until all squadrons are activated.

Each squadron’s base features an activation slider that you can use to track whether or not it has been activated. The activation slider displays one of two colors, orange or blue. If the color on the activation slider matches that on the initiative token, the squadron has not yet been activated.
Deploying Your Fighter Wings
While you are not required to field any squadrons in your fleet, the squadrons that you bring to battle can easily prove the difference between victory and defeat.
It’s hard for capital ships to hit them because most capital ships’ anti-squadron armaments number only one or two dice. Meanwhile, your squadrons each get their own attacks, and your opponent’s ships only get a limited number of defense tokens each round; swarms of starfighters can quickly wear down even the largest of ships.
Accordingly, most admirals acknowledge the threat that squadrons pose by ensuring that each of their ships has its own escorting fighter wing. They may use screens of squadrons to protect their ships, or they may deploy their squadrons more aggressively to pin down enemy squadron groups.
In Armada, whenever two squadrons are at distance “1” of each other, those squadrons are engaged and must abide by the rules for engagement:
- Engaged squadrons cannot move.
- Whenever an engaged squadron attacks, it must attack a squadron instead of attacking a ship.

While it is engaged by the TIE squadron, the X-wing squadron cannot fire on the Victory-class Star Destroyer, leaving its captain free to ignore the pesky X-wings in favor of larger and more important targets.
Whether you’re hoping to negate your opponent’s superior numbers or you’re looking for ways to swarm your opponent’s ships with as many squadrons as possible, you want to consider how engagement can play into strategy.
Ace Pilots and Their Wingmates
As you think about the best ways to use your squadrons, it’s important to remember that not all fighter squadrons are the same, and you’ll want to select the right squadrons for your strategy.
X-wing squadrons, for example, feature the Bomber keyword, which means that while they’re attacking a ship, they do not ignore all their
results. Instead, their results are added to the damage total and allow you to resolve a critical effect as though you had scored a result with a capital ship’s attack.On the other hand, TIE fighter squadrons feature the Swarm keyword. While a TIE squadron is attacking an enemy squadron engaged with another one of your squadrons, it can reroll one die.

In addition to the differences between the different types of starfighters (which we’ll explore more when we take a closer look at the Rebel and Imperial Fighter Squadrons Expansion Packs), there are differences between your standard squadrons and those led by your aces.
An ace X-wing pilot like Luke Skywalker doesn’t necessarily gain any extra speed, hull points, or anti-squadron armament. However, he gains a number of defense tokens, which may, in the long run, prove far more valuable than a couple of hull points. Luke Skywalker, specifically, gains two brace tokens, which each allow him to halve the damage of an attack directed at his squadron. Additionally, ace pilots each have unique abilities, and in Luke’s case, his ability allows him to treat any ship he attacks as though it has no shields, meaning his damage goes straight to its hull. This is even more important when you consider that Luke attacks your opponent’s ships with a black die, which represents a meaningful step up in damage potential from the standard X-wing’s red die.


While your squadrons’ defense tokens work the same as they do for capital ships, they may also permit additional effects. Some ace pilots, like “Howlrunner,” can use the powerful scatter defense token to negate all damage that they would otherwise take from a single attack.
|

Every Starship Matters
“Admiral, we’re in position. All fighters accounted for.”
–Lando Calrissian
The fighter squadrons of Star Wars: Armada may not be as large or hard-hitting as the game’s massive capital ships, but when they’re employed effectively, they offer your fleet tremendous tactical flexibility.
Adding a number of starfighter squadrons to your fleet greatly increases its tactical flexibility!
Every ship matters, no matter how small, large, or heavily outfitted, and in our next preview we’ll look at how you can bring them all together, arm them, command them, equip them with upgrades, and deploy them to engage your enemy!
Udo77- Kriegsheld des MER
Re: Star Wars Armada - NEWS !!! ONLY !!!
IceFace Sa 27 Dez 2014, 00:25
“Hurry. The Alliance should be assembled by now.”
–Leia Organa
The Star Wars galaxy is vast. Thousands of space-faring species inhabit millions of worlds. Their diversity is expressed in their technologies, philosophies, and attitudes, and in Star Wars™: Armada, rules for fleet-building allow you to bring a degree of this diversity to your strategies.
For starters, in Armada, a starship isn’t just a starship. It’s also a weapon that’s wielded by the pilot who flies it or the crew that operate it. It can be enhanced with weapon upgrades, reinforced hull plating, and better comm systems. You might improve your command ship by outfitting it with an expanded hangar bay, or you might simply improve its performance by hand-picking all your crew members from the most elite talent available.
The Armada Core Set contains ten squadrons, three capital ships, nearly one hundred cards, plus a maneuver tool, range ruler, and all the dice, tokens, and command dials that you need to start battling for the fate of the galaxy!
Ships, Crews, Commanders, and Weapons
In Armada, your fleet isn’t just the collection of miniature starships and fighter squadrons that you bring to the table; you also bring a collection of cards that define how your starships will function. These include ship, squadron, upgrade, and commander cards.
Each card has a fleet point cost, indicated by a number in its lower right corner, and in a standard game, you and your opponent can each spend up to a total of 300 fleet points. If you spend fewer fleet points than your opponent, however, you can determine who will have initiative as the first player.
Ship Cards
You need a ship card for each ship you bring to battle. Your choice of ship card for a given miniature will impact both its abilities and its weight in your fleet.


As an example, here we see the ship card for the Victory I-class Star Destroyer (left) presented alongside the ship card for the Victory II-class Star Destroyer (right). The Victory II costs eighty-five fleet points, as opposed to the seventy-five fleet points that you need to spend to add the Victory I to your fleet, and for the extra ten fleet points, you have five of your short-range black dice upgraded to medium-range blue dice, and your upgrade bar changes, losing the missile upgrade option in favor of an ion cannon upgrade slot.
Squadron Cards
As noted in our preview of the game’s fighter squadrons, each squadron can be fielded as a non-unique collection of starfighters, or as one led by an ace pilot. Your decision impacts the abilities, defense tokens (if any), and fleet cost of your squadron.
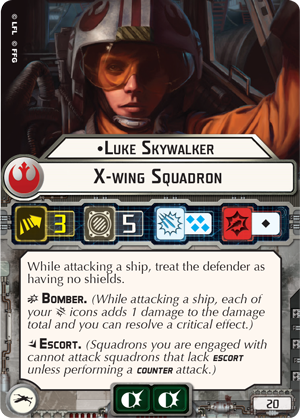

An X-wing squadron led by Luke Skywalker (left) is far more likely to make a major impact than your standard X-wing Squadron (right), but bringing Luke’s talents to your table will cost you an extra seven fleet points.
Upgrade Cards
Upgrade cards come in all forms. You have weapons upgrades, comms upgrades, and crew upgrades, and each ship in your fleet comes with an upgrade bar that indicates what sort of upgrades you can attach to it. For a modest investment of fleet points, each upgrade card introduces a new ability that allows you to customize a ship to better fit into your overall strategy.
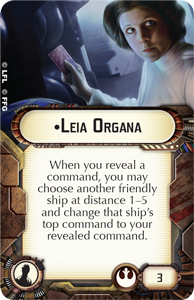
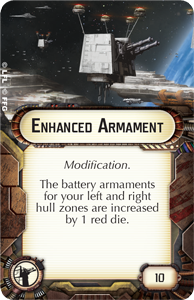

Examples of upgrade cards include the crew member Leia Organa, Enhanced Armament, and the CR90 corvette title, Dodonna’s Pride.
Commander Cards
Each fleet needs a commander. Your commander is a special type of upgrade card, and you must assign one commander to one of your capital ships. This ship then becomes your flagship. You can only have one flagship in your fleet, but it can be any of your ships, regardless of the upgrade icons on its upgrade bar. Then, so long as your flagship remains intact, your commander bolsters your fleet with a powerful and unique ability that you’ll do well to incorporate into your strategy.


The Core Set comes with two commander cards. Grand Moff Tarkin bolsters an Imperial fleet by assigning an extra command token to each of its ships at the start of each Ship Phase. Rebel commander General Dodonna, on the other hand, ensures that the faceup damage you deal your enemies will be as impactful as possible.
As you select the specific ship and squadrons that you’ll add to your fleet, along with any upgrades that you intend to use, you begin to form the outline of a larger strategy. As you change your selections, this outline changes. Accordingly, even with a limited number of ship miniatures, you can field an impressively diverse assortment of fleets, each of which may pursue its own strategy in battle.
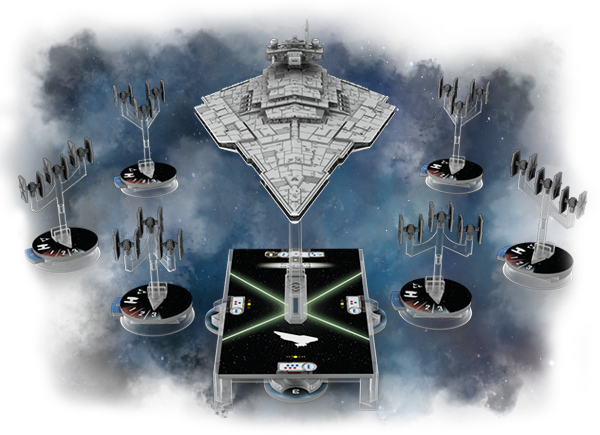
A Victory-class Star Destroyer heads to battle, flanked by six TIE fighter squadrons.
Define Your Objectives
Your selection of ships and fighters to fly into battle isn’t accompanied only by your decisions of how to upgrade them and who to assign as commander. There’s another, critical step to fleet-building in Armada.
Along with its ships, fighters, and upgrades, your fleet must include three objectives. These add variety to each battle by providing a narrative for why your fleets are fighting each other. Importantly, they also change how you score points, so you want to make sure that your choice of objectives fits into your overall strategy.
There are three categories of objectives:
 | Assault: Assault objectives typically identify one or more ships that are worth extra fleet points when destroyed. |
 | Defense: Defense objectives encourage you to position your ships so that they control specific sections of the battlefield. |
 | Navigation: Navigation objectives reward you for maneuvering aggressively and with precision. |
Like Most Wanted, each objective introduces additional rules to impact your setup, as well as a number of unique game effects that can shape the course of a game. Additionally, most objectives introduce ways for you to score points that aren’t based solely upon the costs of the ships and squadrons you destroy.
Expanded Fleet, Expanded Options
For those players who want to explore Armada and its battles beyond the Core Set, the game’s expansion packs increase your options considerably.
As you grow your collection with new expansions, their ships, upgrades, and commanders all offer you new options for fleet-building. Already, in our announcement of the first wave of Armada expansions, we’ve had an early look at the Gladiator-class Star Destroyer, the Assault Frigate Mark II, and the other starships that will arrive to retailers at the same time as the Core Set. Each comes with its own strengths, so that you can build the fleet that best suits your tactics.

Expansions for Armada allow you to incorporate new ships, squadrons, and upgrades into your fleet!
In our next couple previews, we’ll explore the different Wave I ships, as well as their new crews, commanders, and weapons, and we’ll look at how these ships offer different strategic options for your Rebel and Imperial fleets.
IceFace- Boarding Team Mos Eisley
-
Offizielle Ankündigung der Armada DM 2015
Farlander Fr 06 Feb 2015, 16:45
Ralf Siedek aka Thanatos hat in diesem Post die Deutsche Armada Meisterschaft 2015 offiziell verkündet und sie wird
am
Freitag, 13. August 2015 ab 10:30 Uhr
auf der Freusburg bei Kirchen stattfinden.
Zuletzt von Farlander am Fr 06 Feb 2015, 17:16 bearbeitet; insgesamt 2-mal bearbeitet
_________________


Farlander- Mitglied der Ehrengarde

Re: Star Wars Armada - NEWS !!! ONLY !!!
Udo77 Fr 06 Feb 2015, 17:12
Speed Up Your Games
| [url=http://www.fantasyflightgames.com/edge_minisite.asp?eidm=270&enmi=Star Wars: Armada]Star Wars: Armada[/url] | Published 06 February 2015 |
–Darth Vader
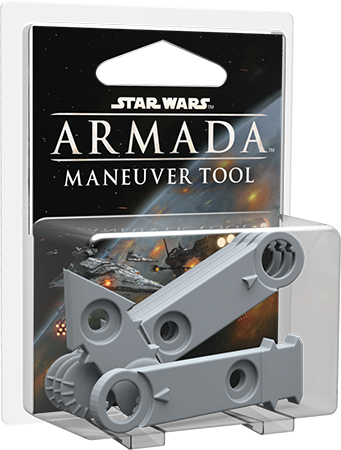
The Star Destroyers are on their way, [url=http://www.fantasyflightgames.com/edge_minisite.asp?eidm=270&enmi=Star Wars: Armada]Star Wars™: Armada[/url] is coming, and Fantasy Flight Games is pleased to announce that the Star Wars™: Armada Maneuver Tool will be made available to players as an Armada accessory pack!
The massive capital starships of Armada feature designs that balance their scale and complexity with ease of use, and the Armada maneuver tool is at the heart of this design. As these ships batter their foes ion cannons, proton torpedoes, and turbolasers, their momentum constantly carries them forward across the battlefield, and the maneuver tool allows you to adjust their courses, even as it accounts for their tremendous inertia.

The Armada maneuver tool.
Capital Ship Movement Made Easy
The Armada maneuver tool is one of the game’s most innovative features and makes it easy for you to set a ship’s course.
Capital ships can’t easily vary their speeds or execute hairpin turns like the starfighters that buzz around them. Accordingly, the maneuver tool lends an element of realism to your ships’ pitch and yaw, working in conjunction with your ships‘ available maneuvers to account for their inertia as they fly through the stars.
To set a ship’s course, you begin by resetting the maneuver tool so that all of its joints are straight. Then your ship’s speed indicates how far it will travel along the maneuver tool. At each joint, you can click the tool left or right a number of times away from the center position as indicated by your ship’s speed chart.
The speed charts for the CR90 corvette (left) and the Victory II-class Star Destroyer (right).
The rows on your ship’s speed chart correspond to the joints on the maneuver tool. The row directly above the speed number relates to the first joint, the second row relates to the second joint, and so forth. An “I” indicates that the joint can be clicked once in either direction, while an “II” means it can be clicked twice. Meanwhile, a “–” means the maneuver tool must remain straight at that joint.
Using the game’s unique maneuver tool, a Rebel player plots a “3” speed maneuver for his Nebulon-B escort frigate.
An Innovative and Integral Game Component
In many ways, the design of the Armada maneuver tool is responsible for enabling the game’s fluid, forward-looking approach to ship movement. It is an innovative and integral part of the game. Whether you use it to add a second, full-size maneuver tool to your games or to build a shorter maneuver tool for use in tight spaces, the Armada Maneuver Tool accessory pack ensures that you’ll be able to keep things calm in engineering as you focus all your firepower on enemy ships.
Look for the Star Wars: Armada Maneuver Tool accessory pack to arrive at retailers in the second quarter of 2015.
Udo77- Kriegsheld des MER
Re: Star Wars Armada - NEWS !!! ONLY !!!
Udo77 Mo 02 März 2015, 19:42
A Look at How Objectives Shape Gameplay in Star Wars™: Armada
“My ship has fallen under attack and I’m afraid my mission to bring you to Alderaan has failed. I have placed information vital to the survival of the Rebellion into the memory systems of this R2 unit. My father will know how to retrieve it. You must see this droid safely delivered to him on Alderaan. This is our most desperate hour.”
–Leia Organa
Recently, in our preview of the fleet-building rules for Star Wars™: Armada, we mentioned that each fleet must contain three objectives. These objectives add a narrative element to your games, helping to explain why you and your opponent are sending starships into battle. More importantly, though, objectives change how you score points, meaning that your games of Armada aren’t just about blasting away more of your opponent’s starships than you lose in the process.
Today, we’ll look at these objectives more closely, reviewing all twelve of them, and exploring how they may influence the path you take toward victory.
Choosing an Objective
There are three categories of objectives in Armada, and you have to bring one objective from each category.
Assault: Assault objectives typically identify one or more ships that are worth extra fleet points when destroyed.

Defense: Defense objectives encourage you to position your ships so that they control specific sections of the battlefield.

Navigation: Navigation objectives reward you for maneuvering aggressively and with precision.
Early in the game’s setup, you and your opponent choose one objective to use for the game.
Setup Step 3. Determine Initiative: The player whose fleet has the lowest total fleet point cost chooses which player is the first player. The first player places the initiative token next to his edge with the a side faceup. If the players are tied in fleet points, flip a coin to decide which player makes the choice.
Setup Step 4. Choose Objective: The first player looks at all three of his opponent’s objectives cards and chooses one to be the objective for the game.
The other objectives are all set aside.
Throughout your game, the additional rules and scoring concerns that the objective introduces can greatly impact your tactics. Therefore, although it’s usually to your advantage to have the initiative throughout a game, it’s easy to imagine situations in which you’ll concede the initiative to your opponent in order to ensure that you play with one of your objectives, forcing your opponent to fight on terms that are favorable to your fleet.
Assault
The four different assault objectives are Advanced Gunnery , Most Wanted , Precision Strike , and Opening Salvo .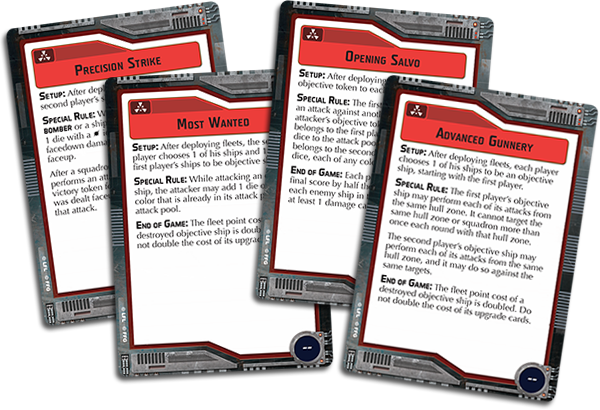
In the case of Advanced Gunnery, your objective ship gains a large tactical advantage, even as it becomes a marked target. Of course, this tactical advantage becomes even more meaningful the more dice you’re able to train upon your enemies. For example, the objective allows a Victory II-class Star Destroyer to fire all six of its front hull zone’s six attack dice a second time. That’s a significant step up from the three attack dice you’d be able to fire from the Star Destroyers left or right hull zone, especially if you didn’t have a legal target in either of those zones.
However, because Advanced Gunnery favors ships, like the Star Destroyer, that feature massive armaments, Rebel players may favor Most Wanted, which adds an extra attack die to each attack against an objective ship. Because the Rebellion’s ships are generally smaller and cost fewer fleet points than the Empire’s, you can fit more of their ships into an Armada fleet. Then, if you have a fleet with five copies of the CR90 Corvette A , the extra dice you’ll gain from Most Wanted will very quickly add up.
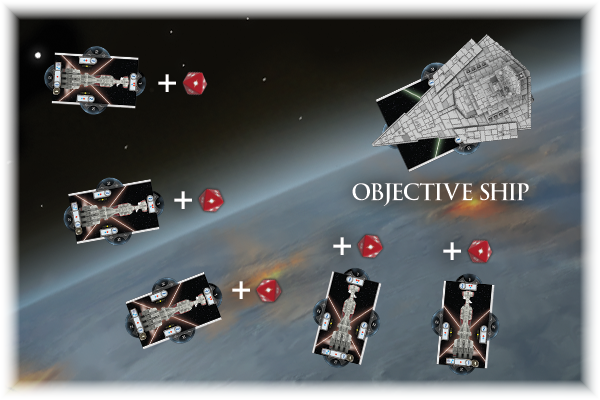
Finally, the Opening Salvo objective adds extra dice to both players’ opening attacks. At the beginning of the game, each ship is marked with an objective token that it spends on its first attack against another ship. When it spends this token, it gains two attack dice. If it’s the first player’s ship, it gains two red attack dice. If it’s the second player’s ship, it gains two attack dice of the player’s choice. However, these extra dice do more than make it easier for you to obliterate your opponent’s biggest ship; they force you to make an important decision. Will you focus your fire or spread it around to force damage onto each of your opponent’s ships?
Because Opening Salvo allows you to score half the fleet point cost of each enemy ship that you damage, you can just as easily score the same number of points by damaging two identical ships as you can by fully eliminating one of them. As an example, if you were playing against a fleet with two Victory-class Star Destroyers, that means you could score the same number of points by punching through the one point of rear shielding to land a single damage on each as you could by blasting through all eight hull.
Defense
The four defense objectives are Fire Lanes , Contested Outpost , Fleet Ambush , and Hyperspace Assault .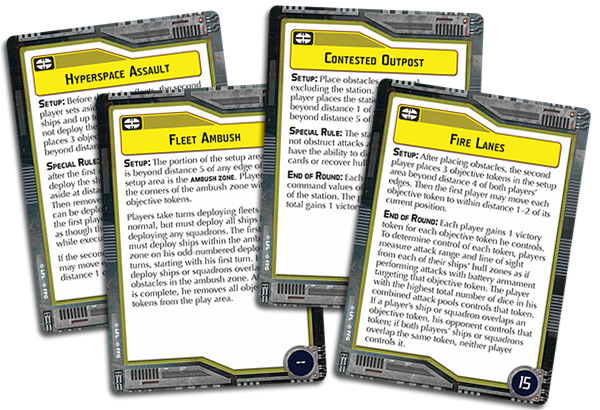
In games featuring the Fire Lanes objective, you can earn victory tokens by positioning your ships to seize control of the game’s three objective tokens. At the end of each round, you and your opponent compete for control of the objective tokens:
“To determine control of each token, players measure attack range and line of sight from each of their ships’ hull zones as if performing attacks with battery armament targeting that objective token. The player with the highest total number of dice in his combined attack pools controls that token. If a player’s ship or squadron overlaps an objective token, his opponent controls that token; if both players’ ships or squadrons overlap the same token, neither player controls it.”
Since each objective token is worth fifteen victory points, you could score as many as forty-five points each round by deploying and maneuvering your ships to control these objective tokens. However, that also means that you’ll likely be maneuvering your fleet in a fashion that’s a little reckless and leaves it exposed to your enemy sooner than you might like. For example, it’s going to be terribly difficult for a Rebel’s CR90 corvettes and Nebulon-B frigates to wrest an objective token away from an Imperial’s Victory-class Star Destroyers, and the effort may simply leave you vulnerable to the Imperial’s guns.
The second defense objective, Contested Outpost, is arguably the most straight-forward of all defense objectives. As with Fire Lanes, the players are encouraged to maneuver their ships in a fashion to win victory tokens; the difference, however, is that Contested Outpost offers twenty points each turn to whichever player is able to count the greatest total command value of all ships within distance “1” of the station. With as many as 120 potential victory points at stake, Contested Outpost encourages players to race into combat at close range. The trick, then, is to make sure that your ships survive long enough to count their command values at the end of the round!
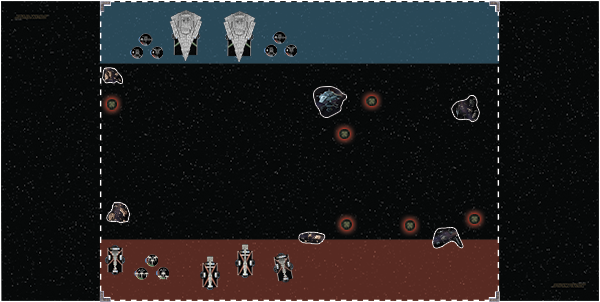
Fleet Ambush doesn’t introduce any objective tokens or victory points to change the shape of the game. Instead, it forces the first player to split his fleet in two during the game’s setup. Normally, all ships must deploy within distance “3” of its controller’s edge of the map. However, the setup rules on Fleet Ambush create an “ambush zone” in the middle of the table, at distance “5” from each edge of the table. Then, the first player must deploy every other one of his ships into this ambush zone, even as the other half must follow the standard deployment rules.
Accordingly, Fleet Ambush immediately impacts the game in two ways. First, it accelerates the game, as the players begin with ships and squadrons closer to firing range from the very outset. Second, it allows the second player to isolate some of the first player’s ships, leaving them more vulnerable to the second player’s fleet. Still, even though Fleet Ambush, like all objectives, favors the second player, you might choose to face it as the first player if you feel you can quickly assemble your fleet or use the positioning to your advantage, possibly by racing your Assault Frigate Mark II out of the ambush zone and to the side of your opponent’s ships.
Finally, Hyperspace Assault allows the second player to set up a deadly flanking maneuver with surprising ease. At the beginning of the game, the second player sets aside one of his small or medium ships and up to three squadrons. These are not deployed during setup. Instead, the second player places three objective tokens in the play area beyond distance “3” of both players’ edges, and the ship and squadrons that were set aside can enter within distance “1” of any of these objective tokens at the beginning of any round after the first.
This means that as the first player, you have to adjust your strategy and the way you maneuver your fleet. You know that your ships are going to be flanked at some point, but, in the meantime, you have a significant advantage in firepower among the ships in play. Then, if you’re running a fleet of Star Destroyers against a Rebel player, you might be willing to risk the flank, guarding your back with a Gladiator-class Star Destroyer, even as you rush your Victory-class Star Destroyers forward toward the bulk of your opponent’s fleet.

Navigation
The four navigation objectives are Intel Sweep , Minefields , Superior Positions , and Dangerous Territory .
At first glance, Intel Sweep appears to favor fast and agile ships. During setup, each player chooses one ship to mark as an objective ship. Then, whenever this objective ship reveals a command dial within distance “1” of one of the game’s five objective tokens, its owner scores a victory token. Unlike most victory tokens, these aren’t worth anything on their own, but the player who manages to score the most victory tokens ends up collecting seventy-five victory points at the end of the game.
Still, while the fast, agile ships are best suited to collecting the objective’s victory tokens, only one of them can be the objective ship, and since only the objective ship can actually collect the victory tokens, it’s going to be a heavily favored target. Accordingly, you may actually consider incorporating Intel Sweep into a strategy built around utilizing a fleet of heavy ships that can quickly deal a punishing amount of damage to a single ship and that can simultaneously endure the brunt of whatever your opponent may throw against you.
Meanwhile, players will find it much more difficult to fly their ships safely about the battlefield in any game featuring the Minefields objective. Not only will you have to avoid damaging collisions with obstacles; you’ll have to avoid the explosive damage of the game’s six mines. Moreover, since the second player places all the mines, this objective grants him the means to influence the first player’s flight lanes.
Finally, Superior Positions forces the first player to deploy all of his ships and squadrons before the second player deploys any, granting the second player perfect knowledge of his opponent’s deployment strategy. If you’re the second player, Superior Positions may allow you to line up all your guns on an approach at the side of your opponent’s fleet, or it may help you get into flanking position where your attacks against the rear hull zones of your enemy’s ships can help you score victory tokens. And since you score victory tokens for every attack that deals damage, not just for attacks performed by your capital ships, Superior Positions is an excellent objective choice for fleets built around squadrons with the bomber ability.
Meeting Your Objectives En Route to Victory
Unless one player manages to eliminate all opposing ships before the end of the sixth round, the winner of a game of Armada is the player who scores the most points. Many times, you or your opponent will score the majority of those points by destroying enemy ships and squadrons. Each ship or squadron is worth a number of points equal to its fleet cost, as well as the fleet cost of its upgrades.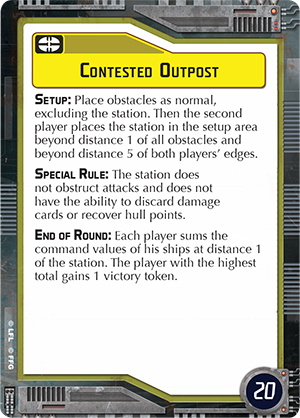 You could get thirty-nine points for destroying your opponent’s CR90 Corvette B . Your opponent might score 113 points by destroying the Gladiator I-class Star Destroyer that you outfitted with Admiral Screed , Engine Techs , Expanded Launchers , and the Demolisher title. Or you might score 120 points by winning all six of the victory tokens available in the Contested Outpost objective.
In Armada, it never hurts to destroy your opponent’s ships, but it’s not the only way to win the war. In the end, you must always adjust your strategy to balance your pursuit of enemy ships against against your pursuit of the points you can earn from the objective. In the balance lies victory.
What objectives best suit your style? How would you use them with your favorite fleet? Which would give your fleet the most trouble, and how would you adapt? Share your thoughts with the other members of the Armada community in our forums. The time to deploy your fleet is fast approaching!
Udo77- Kriegsheld des MER
Re: Star Wars Armada - NEWS !!! ONLY !!!
Farlander Mi 04 März 2015, 13:19

_________________
Farlander- Mitglied der Ehrengarde
Re: Star Wars Armada - NEWS !!! ONLY !!!
Farlander Mo 16 März 2015, 21:17
“Well, look at you, a general, huh?”
–Han Solo
Your wait is nearly over. The rules for Star Wars™: Armada (pdf, 27 MB) are now available on the game’s support page, and the Core Set is scheduled to arrive at retailers next week!
The epic two-player miniatures game of tactical fleet battles in the Star Wars universe, Armada grants you the command of a full fleet of starships and fighter squadrons. Assemble your fleet, fly to battle, and blast your way to victory. In Armada, you deliver the commands; you are the one responsible for leading your fleet to victory and, ultimately, shaping the course of history.
In earlier previews, we’ve explored how these ships and squadrons battle and move. We’ve looked at the rules for fleet building, and we’ve explored many of the different ships, fighters, and upgrades available in the game’s Core Set and first wave of expansion packs. Today, we take a look at how all these elements can come together by exploring several sample fleets and the strategies they may employ.
The Armada Core Set contains ten unpainted squadrons, three pre-painted capital ships, nine custom dice, dozens of tokens, nearly one hundred cards, and an innovative maneuver tool that adds a unique feel to the way your capital ships must accommodate for inertia as they maneuver throughout the battlefield!
Two Fleets from a Single Core Set
Your games of Armada start with the Core Set.
Though you can’t build a fleet worth a full 300 fleet points from a single copy of the Armada Core Set, you will still find a lot of room to experiment with your fleet builds, and you can begin to gauge the impacts of the different variations of your starships, the talents of your ace starfighter pilots, and the upgrades you select.
As mentioned in the Learn to Play booklet, if you have a single copy of the Core Set, you are encouraged to play with a fleet worth 180 points, instead of the standard 300 points. Additionally, you’re encouraged to play with a random objective card. In this instance, when the first player would normally select one of the second player’s objectives to use in the game, the second player shuffles all twelve of the game’s objectives, draws two, and selects one to use.
Our first two fleets illustrate some of the Core Set’s many possibilities. In fact, the fleets posted below can both be assembled from a single, shared Core Set.
Imperial Navy
Victory II-class Star Destroyer (85)
Grand Moff Tarkin (38)
Enhanced Armament (10)
Dominator (12)
"Howlrunner" (16)
TIE Fighter Squadron (8)
TIE Fighter Squadron (8)
Total Fleet Points: 177
Rebel Alliance
CR90 Corvette B (39)
General Dodonna (20)
Leia Organa (3)
Dodonna's Pride (6)
Nebulon-B Escort Frigate (57)
Redemption (8)
Luke Skywalker (20)
X-wing Squadron (13)
X-wing Squadron (13)
Total Fleet Points: 179
Imperial Strategy:
This Imperial fleet invests nearly all of its resources into a single, behemoth Victory II-class Star Destroyer. Equipped with both Enhanced Armament and the Dominator title, your ship can fire as many as eight attack dice from its forward hull zone and six dice from its left or right hull zones. With such punishing volleys, you threaten to take out your enemy’s ships anytime you get within medium range.
Accordingly, you don’t want to waste your attacks by directing them at enemy fighters, so your fleet uses of a screen of three TIE fighter squadrons. You don’t need to to destroy enemy fighters; you just need to hold them at bay. Still, the addition of “Howlrunner” and her defense tokens adds to both your fighters’ resilience and their dogfighting capabilities.
Rebel Strategy:
Meanwhile, the Rebel fleet aims to take advantage of Luke Skywalker and Dodonna’s Pride to deal damage directly to your enemy’s hull, bypassing all shields. Simultaneously, you’ll want to use your Nebulon-B Escort Frigate and your two basic X-wing Squadrons to establish a flank, forcing your opponent to attack either one of your ships or the other, but without being able to unleash truly powerful attacks at either.
Two Tournament-Ready Wave One Fleets
Several weeks from now, when the first wave of Armada expansion packs arrives, your fleet-building options will increase exponentially. Both the Imperials and Rebels gain two different commanders around which they can build their fleets, and both gain new starships and starfighters, which all present different tactical advantages. By bringing these elements together in different fashions, you can envision a wide range of viable strategies.
To this end, the fleets listed below illustrate only a tiny fraction of the myriad possibilities within the game.
Imperial Navy
Victory I-class Star Destroyer (73)
Admiral Screed (26)
Gunnery Team (7)
Dominator (12)
Gladiator I-class Star Destroyer (56)
Assault Concussion Missiles (7)
Engine Techs (8)
Demolisher (10)
Gladiator I-class Star Destroyer (56)
Assault Concussion Missiles (7)
Engine Techs (8)
Insidious (3)
TIE Interceptor Squadron (11)
TIE Fighter Squadron (8)
TIE Fighter Squadron (8)
Total Fleet Points: 300
Objectives:
Advanced Gunnery
Hyperspace Assault
Minefields
Rebel Alliance
Assault Frigate Mark II B (72)
General Dodonna (20)
Gallant Haven (8)
Nebulon-B Escort Frigate (57)
Adar Tallon (10)
Yavaris (5)
CR90 Corvette B (39)
Dodonna's Pride (6)
Luke Skywalker (20)
Wedge Antilles (19)
"Dutch" Vander (16)
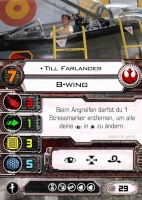
B-wing Squadron (14)
B-wing Squadron (14)
Total Fleet Points: 300
Objectives:
Precision Strike
Hyperspace Assault
Superior Positions
Imperial Strategy:
The first thing you might note about this Imperial fleet, compared to the Core Set fleet, is that it makes use of two Gladiator I-class Star Destroyers and Admiral Screed. The goal is to take advantage of the Gladiator’s speed to race into close combat with enemy ships. Your Engine Techs are tremendously valuable, here. Once you get into range to attack with all your dice, Admiral Screed guarantees you at least one black result per activation per ship, and that means you can trigger your Assault Concussion Missiles for two extra damage, assigned to the hull zones adjacent to the one you’re targeting.
Moreover, because the Gladiator I-class Star Destroyer can fire four attack dice from both its left and right hull zones, it helps you counter any plans the Rebels might have to flank your Victory I-class Star Destroyer.
Your selection of objectives further emphasizes your ships’ massive firepower. Few Rebels would ever dare to let you fire twice from the forward hull of your Victory I-class Star Destroyer, and just as few are likely to allow you to use Hyperspace Assault to drop your Victory and a screen of TIEs directly into a flanking position behind their most important ship. Thus, if you’re the second player, you’ll almost always end up playing with Minefields, and you’ll want to practice using the obstacles and mines to set up a battlefield that forces you and your opponent to fly straight at each other.
Rebel Strategy:
On the other hand, the Rebel fleet doesn’t try to match Imperial ships one for one. Instead, it takes advantage of the Rebellion’s fighter squadrons and their strengths. For starters, the Yavaris and Gallant Haven allow your squadrons to attack more often and survive longer. So long as you can keep your capital ships intact, your squadrons, led by Wedge Antilles, should make short work of opposing fighters, and then you can use them to swarm enemy ships.
This strategy is further enhanced by its objectives. Like the Imperial fleet, this one uses Hyperspace Assault to flank its foes. However, the objective is arguably more impactful in this fleet because it doesn’t just allow you to ambush your opponent with one of your capital ships and up to three fighter squadrons; it allows you to bring those vessels into firing range against the weaker rear arc of whichever enemy ship you target. Meanwhile, Precision Strike and Superior Positions both allow you to seize victory points with your squadrons, not just your capital ships. That means you can force your opponent to consider attacks from eight different directions, and your squadrons may even draw your enemy’s fire away from your capital ships.
Notably, though, this Rebel fleet can be a little tricky to coordinate. You have ships and squadrons with several different speeds. Among other concerns, your B-wing Squadrons are slow; there’s just no other way to put it. However, those B-wing Squadrons can more than earn their inclusion as soon as you get them into range of a slow-moving enemy ship. Due to the rules for collisions, each time your opponent runs into your B-wing Squadrons, you can move them back in front of the ship, forcing that ship to dramatically adjust its speed, or run into your squadrons over and over, allowing you to keep them in firing range round after round after round.
In this example, the Rebel player’s CR90 corvette overlaps two fighter squadrons.
After the Rebel player finishes the corvette’s movement, the Imperial player replaces all of the squadrons that the corvette overlapped. In this way, the TIE Fighter Squadron gain some distance from the X-wing Squadron and can end up adjacent to any edge of the corvette’s base.
Additionally, you need to keep your ships in close range of your fighters in order to command them and take advantage of the abilities of the Yavaris and Adar Tallon. In turn, getting your fighters into position may force your ships closer to the enemy than you’d like, so you’ll want to practice your flanking maneuvers and experiment with the best orders for your commands.
The Fleet Is Yours
The fleet is yours. The enemy is nearly within firing range. Ready your guns, and command your ships into position. Star Wars: Armada arrives at retailers next week, the rules are now available for download, and the Star Wars galaxy will soon tremble with the fury of your battles!
_________________
Farlander- Mitglied der Ehrengarde
Re: Star Wars Armada - NEWS !!! ONLY !!!
Udo77 Mo 30 März 2015, 22:50

"The time for our attack has come."
–Mon Mothma
The time to attack has come. Your fleet awaits your command. The fate of the galaxy hangs in the balance. Star Wars™: Armada is now available at your local retailer and online through our webstore!
The two-player miniatures game of epic Star Wars space battles, Armada places you and your opponent in command of rival fleets. Massive war machines and crews of thousands await your commands. You assemble a fleet of capital ships and starfighter squadrons, then upgrade it with elite pilots, crew members, and advanced weaponry. You select your objective. Then you head to battle.

Now, the Core Set is available, and the time for lessons and theory has come to an end. Civil War rages across the galaxy, your enemy has shown you a weakness, and the time has come to strike!
What Do You Get in the Core Set?
Your battles begin with the Core Set, which contains everything you need to get the enemy in your sights and launch devastating volleys of turbolaser fire, ion blasts, missiles, and proton torpedoes. You get ships, of course, but you also get much more than that. Just as your ships need vast crews to fly them, the Core Set provides you a wide array of cards, tokens, dice, and a custom maneuver tool to take your ships to war.Ships and Squadrons
The Star Wars: Armada Core Set presents three carefully detailed and pre-painted capital ships for your fleets: one Victory-class Star Destroyer for the Imperials, and two ships for the Rebellion, one CR90 Corelian corvette and one Nebulon-B frigate.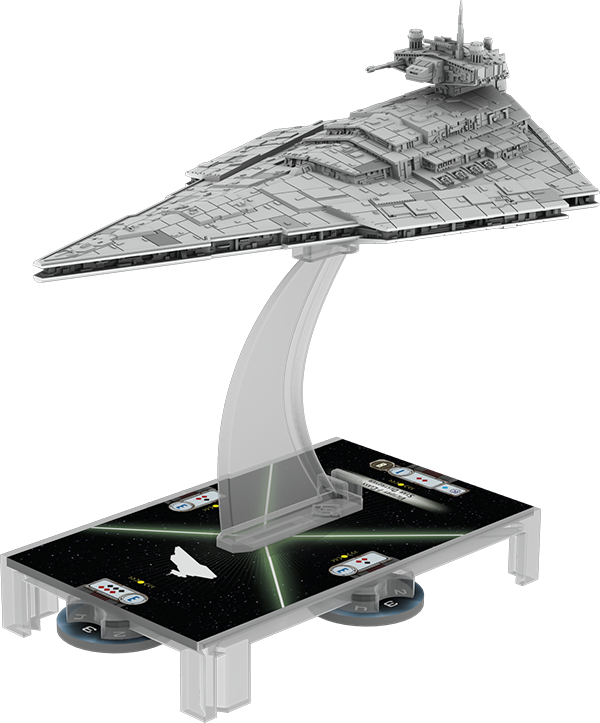
The Victory-class Star Destroyer

The CR90 Corellian corvette

The Nebulon-B frigate

The Armada Core Set comes with six unpainted TIE fighter squadrons

The Armada Core Set comes with four unpainted X-wing squadrons
Cards and Tokens
Each ship in Armada is represented by a ship card and a matching ship token. The Core Set contains two ship cards and one double-sided ship token for each of the three different ships, for a total of six ship cards and three double-sided ship tokens. These condense a great deal of information into a format that's easily accessible. Even at a quick glance, you can identify the ship's name, its anti-squadron armament, its hull rating, its four hull zones, the armament of each, and their shield values.


To ensure that you enjoy a wide range of fleet building possibilities, the Armada Core Set comes with six ship cards, four squadron cards, twelve objective cards, and eighteen upgrade cards. These upgrades are further divided between ten different upgrade types, each of which is clearly designated by an icon and can only be attached to a ship with the matching icon type in its upgrade bar:


Meanwhile, the Core Set also comes with more than eighty tokens. These include your three ship tokens, as well as six obstacle tokens, twelve defense tokens, twelve command tokens, ten victory tokens, and more. It will take you a few minutes to extract them from the punchboard, but these tokens help power your ships, add dimension to the battlefield, allow you to store and track your commands for use at just the right moment, and help you on your way to victory.
Range Ruler and Attack Dice
As your battles begin and you and your opponent maneuver your fleets into attack position, you will need the Core Set's range ruler and attack dice to line up your attacks and launch them at the enemy. The double-sided range ruler features a speed guide for your squadrons on one side and a series of firing ranges on the other. Each of these range increments features a number of colored icons that indicate which of your ship's attack dice can possibly hit a target at that particular range increment. For example, the Nebulon-B Support Refit might be able to hit a Star Destroyer with all three of its red attack dice at long range, but a CR90 Corvette B at the same range wouldn't even be able to connect with any of its blue attack dice.
Maneuver Tool
The final, distinctive ingredient of your Armada experience is the Core Set's unique maneuver tool, which comes articulated at four different joints. As we've shown in our previews, this innovative game tool allows you to quickly set your ships' courses and fly them through space, all while accounting for their awesome inertia.
A Rebel player uses the Armada maneuver tool to execute a "3" speed maneuver with a Nebulon-B frigate.
Pick Up Your Core Set Today
What's in the Armada Core Set? Open it, and you'll find all the above components, along with a Learn to Play rulebook and reference guide. You'll find all the command dials and speed dials and everything else that you need to play. Open the box, assemble your ships, build your fleet, and head to war. The Armada Core Set is your key to the galaxy's greatest space battles. More than starships, squadrons, and cards, it comes with action and drama. It offers you the opportunity to recreate and relive your favorite Star Wars space battles. If you're interested, it's your ticket to the game's Organized Play program, it's the foundation of a fleet that you can grow with the game's different expansions, and it's worth untold hours of enjoyment.
Udo77- Kriegsheld des MER
Re: Star Wars Armada - NEWS !!! ONLY !!!
Udo77 Fr 24 Apr 2015, 07:56

Udo77- Kriegsheld des MER
[ARMADA] Neue Turnierregeln 1.0.3
Farlander Mi 20 Mai 2015, 23:14
Link zu FFG
_________________
Farlander- Mitglied der Ehrengarde
Re: Star Wars Armada - NEWS !!! ONLY !!!
Barlmoro Mo 13 Jul 2015, 20:45
Of course, there's still plenty of time to prepare for the looming space battles of the North American Championships, as well as for those that will follow at the World Championships in November, but what do you need to learn in order to enter an engagement and emerge victorious? Today, and over the next few weeks, the Armada developers address that question in a series of strategy articles in which they look at some of the game's finer points.

Developer Sam Stewart on the Many Paths to Victory
In Armada, capital starships and fighter squadrons wage heated space battles over six rounds. Each fleet's goal is to earn the most victory points by the end of the game. However, getting those victory points is more than just a matter of killing the enemy. Strategic choices mean that you may have plenty of opportunities to earn victory points, and those strategic choices come in the form of Objective cards.The Power of Objectives
If you build your fleet and pick your Objective cards right, Armada is one game that you can win even as your opponent is decimating your fleet.That may not be likely to happen, but as befits a game of fleet engagements, working toward your objectives is a major strategic part of the game. Objectives are designed so that they can completely change the tone and play style of a match, and smart admirals are always going to take them into account on their paths to victory.
There are two broad approaches towards managing objectives, and the primary difference is whether or not you want to bid for initiative. The choice to be first or second player goes to the player with the smallest fleet, and one of the first choices a player needs to make is whether to deliberately build a fleet with a reduced number of fleet points in order to win that choice, or to build a fleet as close to the full fleet point limit as possible.
Players who try to win the choice by building smaller fleets should generally plan on claiming initiative. The right to activate ships and squadrons first in every phase is extremely powerful, and it allows you to put your opponent on the back foot. Conversely, players who build a fleet as close to the point limit as possible should plan on forfeiting the initiative, and should build their lists accordingly. This is important, because players who plan on claiming initiative and being first player have to build their lists to accommodate their opponents' objectives, while players who anticipate playing as second player should build their lists to work with the objectives they choose.

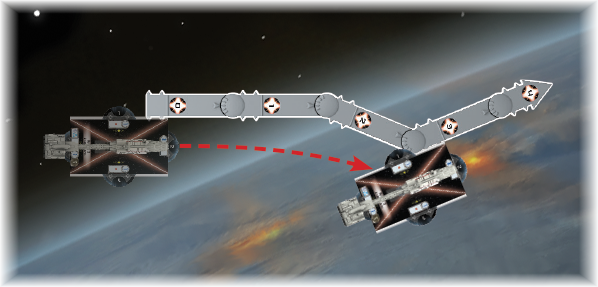
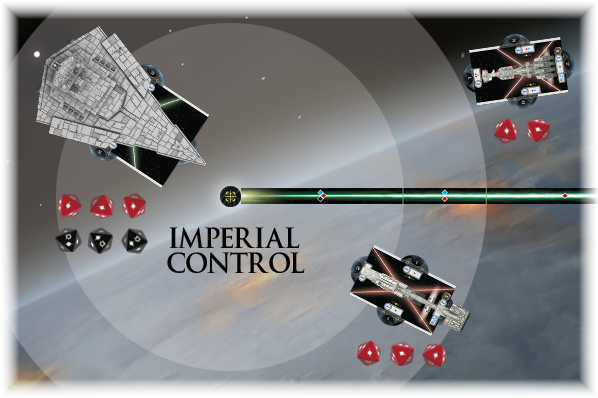
Caught in range of the Star Destroyer's main guns, the Rebel CR-90 appears doomed…

…except for the fact that the Rebellion has the initiative. This means the Rebel player can choose to activate the CR-90 first, fire twice at the Star Destroyer's forward arc, and then race past the Star Destroyer at speed "4," ducking into the Star Destroyer's much less lethal rear arc.
Seizing the Initiative
When you decide to take the initiative as first player, you must then select one of the second player's three objectives to use during the game. This means you cannot guarantee that the game's objective will fit your fleet, so you need to build an "all comers" list that can accommodate a lot of different scenarios. It behooves you to build a fleet that is both more combat-oriented, and also more generalist.Generalist fleets tend to incorporate a mix of both smaller, more maneuverable vessels, and larger ships that can take – and dish out – a serious pounding. These fleets also take a mix of squadrons that can fill multiple roles, intercepting dedicated bomber wings when necessary or turning their guns against enemy ships if your opponent didn’t bother to bring fighter cover of her own.
The first player's fleet also needs to be heavily combat-focused. As first player, you cannot guarantee that you’ll be able to pick an objective that plays to any of your fleet's strengths, so you must always be prepared to score your victory points by destroying enemy ships. This is where it’s good to have a powerful warship and a mix of squadrons with Bomber or squadrons like X-wings that are good at taking out enemy squadrons and still decent at damaging capital ships.

A balanced Imperial fleet designed to bid for initiative at 296 fleet points.
The Second Player
As second player, you sacrifice the initiative but force your opponent to play with one of the three objectives you bring to the table. This also means that you win the luxury of tailoring your fleet to fit your objectives. It's worth remembering, here, that going second doesn't just force your opponent to play with an objective that matches your fleet's composition, but all of the game's objectives are designed to help the second player in some way.This means that as second player you can build your fleet with a more focused purpose. For example, if you're playing with a Rebel fleet, you may want to focus it around multiple CR-90 Corvettes and a few unique squadrons. This may seem risky, since the fleet won’t have heavy guns to kill off an opponent’s larger ships. But if you pick the right objectives, you won't have to kill off those ships. You can focus on scoring your victory points via your objectives, and you'll want to ensure your opponent faces three different “no-win” options at the beginning of the game.
For example, the fleet above could benefit from the objectives Dangerous Territory , Most Wanted , and Fire Lanes.
A 300-point Rebel fleet built to take advantage of its three objectives: Dangerous Territory, Most Wanted, and Fire Lanes.
Fire Lanes can also benefit multiple small ships, as the second player gets to set up the objective tokens in advantageous positions, where they can be easily accessed by small, fast ships.
Finally, Most Wanted is great for you as the second player and commander of a fleet of small ships because you can afford to have it spend the whole game fleeing engagements. Meanwhile, you can pick one of her opponent’s medium or large ships as the other objective ship, which will make all of your attacks against that ship much more powerful.
Kills or Objectives
Once you and your opponent sit down at the table, you want to decide whether you’re going to focus on scoring your victory points by meeting the objectives or by killing off enemy ships and squadrons. Sometimes, the decision is easy. Not all objectives offer ways to gain additional victory points, and some of the objectives simply increase the fleet point values of objective ships, meaning you still have to kill your opponent's objective ship in order to score the additional points. In these cases, you’ll have to go for kills no matter what.
Many objectives, however, do offer ways to score victory tokens without eliminating enemy ships, and that’s where your choice becomes interesting. However, even as you decide how you want to go after your victory points, there are some things worth keeping in mind.
First, it’s almost never good to ignore victory tokens entirely. Only a few objectives, such as Intel Sweep , provide an “all or nothing” approach to scoring additional victory points; most objectives give out extra points based on the number of victory tokens each player accumulates throughout the battle. That means even if you plan on wiping out your enemy, you should make the effort to score a couple victory tokens. After all, your attacks may sometimes fail, but victory tokens are a sure thing once they’ve been scored.

Kills aren't everything. If you can score five objective tokens with Superior Positions, they're worth more victory points than a Victory I-class Star Destroyer !
Even if your fleet isn’t very good at scoring the objectives, you can still use the objectives to your advantage. As long as you know where your opponent needs to go to gain victory tokens, you can position your ships to intercept hers.
Know When To Pull Out
One of the more important lessons for any Armada fleet admiral is learning to quit while you’re ahead. Throughout the game, you'll want to keep in mind how many victory tokens you’ve scored, how many your opponent has scored, and roughly how many fleet points worth of ships and squadrons each side has killed.Since Armada has a fixed turn limit and limited maneuverability, there may come a time when breaking off an engagement and flying away on late turns is your best strategy. If you find yourself ahead on points by round five, commanding a damaged ship or an expensive squadron like Tycho Celchu to cut and run from an engagement may keep it alive, and that keeps your opponent from scoring it for victory points.
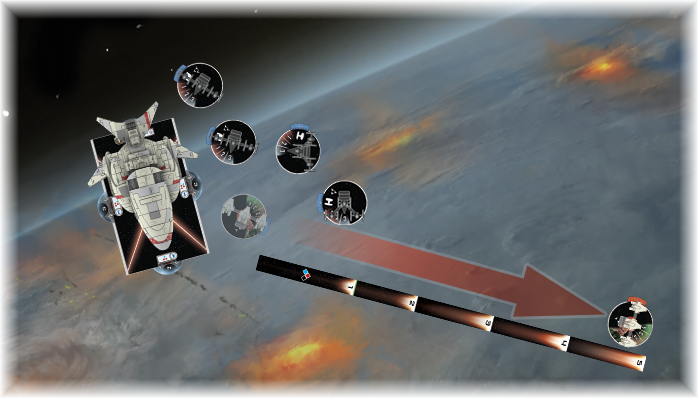
The Rebel player commands a damaged Tycho Celchu to flee the battle, hoping to deny the Imperial player sixteen possible victory points.
Not only do you give your opponent free reign of the board and the ability to score objectives, but the size of the battlefield and your ships' limited maneuverability make it difficult to hide forever. Tracking down a fleeing enemy is far from impossible, and fleeing early telegraphs your intentions, then gives your opponent plenty of time to intercept and destroy at least one or two ships.
Use Your Options
One of the things that keeps Armada interesting is the way that all of its elements work together. In the end, victory goes to the admiral who can manage all those elements best and make them work toward the larger, overall goal.
Set Your Course
There are many ways to approach your engagements in Armada, but the simplest and most obvious path to victory is always the elimination of all your opponent's ships and squadrons. However, such an aggressive and bloodthirsty approach to the game may not always be the best. The game's objectives ensure that your battles are strategic endeavors, not merely tactical slugfests. In the end, the victory doesn't always go to the player who destroyed the most ships and squadrons; it goes to the player who maintained focus on the larger goal and pursued them through maneuvering, battling, and the accumulation of objective tokens.We'll continue our review of these elements next week when producer Michael Gernes discusses the importance and practice of maneuvering your ships!
Barlmoro- Boarding Team Mos Eisley
Move into Attack Position
Farlander Mo 20 Jul 2015, 17:24
"The shield must be deactivated if any attack is to be attempted. Once the shield is down, our cruisers will create a perimeter, while the fighters fly into the superstructure and attempt to knock out the main reactor."
–Admiral Ackbar
At Gen Con Indy, fans of Star Wars™: Armada will have their chance to participate in the game's first Championship-level event, the North American Championship Tournament. What will participating fleet admirals need to know in order to emerge victorious from their engagements? What will they need to continue practicing in order to win their battles at the World Championships in November? The game's developers have decided to address these questions in a series of strategy articles intended to rush commanders straight out of the Academy to battle readiness and to help veterans focus on the basics.
Last week, developer Sam Stewart reminded us that the game is about more than its explosive volleys of cannons, missiles, and torpedoes; it's about scoring the most victory points over six rounds, and that means you need always to keep at least one eye toward your objectives. This week, producer Michael Gernes explores one of the game's most critical skills – maneuvering your ships.

Producer Michael Gernes on Maneuvering into Attack Position
Maneuvering your ships in Star Wars: Armada takes skill. Arguably, it is the most critical skill to practice. Mastering the maneuver system is necessary to play the game at its deeper levels. Learning how to outmaneuver your opponent doesn't guarantee you a win, but it can help you turn a mismatch into an upset, or turn the tables back in your favor after a momentary setback.
The importance of your maneuvers will probably become obvious as soon as you finish playing your first games. You may see how the strengths of your ships and upgrades are diminished if you can't get them into attack position, and you may also see how quickly a battle can turn if you manage to trap your opponent's ship in range of all your biggest guns.
Maneuvering your ships is a learned skill, and there's no substitute for practice. Playing the game and maneuvering your ships time and again is the best way to develop your skills to the point where you don't have to actively think about them. However, there are some general practices and techniques that can help you to more quickly gain mastery.
Develop Your Battle Plan
First, you need to have a general plan at the start of each game for how each ship and your overall fleet will move throughout the battle. For example, if you're playing a Rebel fleet composed of an Assault Frigate Mark II A and two Nebulon-B Escort Frigates , you could plan to sail your assault frigate up the left side of the board at speed three, turning around the enemy rear by mid-game while your Nebulon-B frigates move slowly up on your right, turning one click to the left each round to keep their front arcs on the Star Destroyers.

Of course, you should adjust your battle plan for several factors, including your ships' capabilities, the chosen objective card, the placement of obstacles, and the composition of the enemy fleet. You also need to deploy your ships and set their initial speeds to fit with your plan. Armada may allow players to make free use of the maneuver tool, but it can be very difficult to overcome an initial setup that leaves your ships out of position. You will find it hard to maximize your firepower or score on the game's objective if you're forced to plan commands just to avoid overlapping obstacles or drifting into your opponent's best firing arcs.
As an extension of this concept, you want to anticipate how your opponent will maneuver throughout the game. This will change depending on the aforementioned factors. For example, if your opponent is the second player in a game using Contested Outpost , and brings a fleet based around two Victory II-class Star Destroyers , you can expect a creeping, defensive posture centered around the station.

You'll want to make your plans accordingly and set up your ships' approaches based on where you expect the enemy fleet to be at each stage of the game.
If you plan your approach well, you won't need to choose each round, or dread the fact that your high command value might delay your ability to adjust your course. Instead, you'll have a feel for planning just the right command at the right time, and maximize the effectiveness of the commands you plot. In this case, saving a token on round one may give you all the flexibility you need to accomplish your goals.
Get to Know Your Ships
When you set your course, you want to pay attention to each of your ships' yaw values, especially when you resolve the command. It's obvious that better yaw on a joint means better turning capability, but at speeds two through four, it also pays to observe how the yaw values at adjacent joints can build on each other when the extra yaw from the command is applied. For example, a Nebulon-B frigate traveling at speed three can make a different 90-degree left turn depending on whether it uses its extra click at the first or second joint. Putting that extra click at the second joint allows the ship to travel father before making a hook turn at the end of a straighter course. Putting the extra click at the first join allows the ship to make a tighter left turn, gaining a more lateral movement.
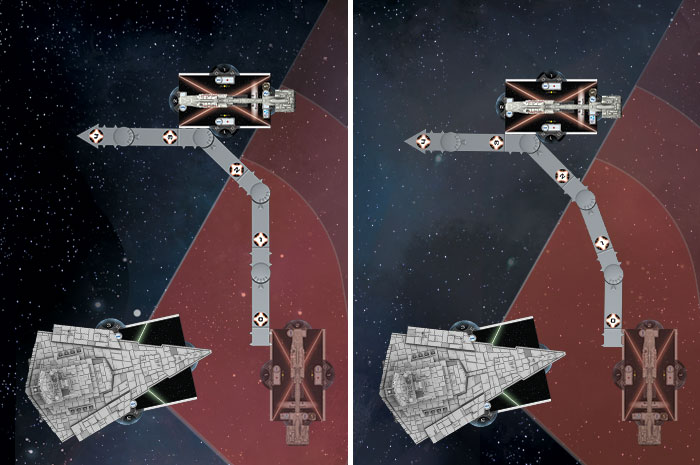
The variation between the two courses is relatively minor but can make the difference between getting caught in a Star Destroyer's front arc or surviving another round.
Becoming familiar with your ships' yaw values to this level also helps you to get maximum advantage out of any upgrade cards that affect your maneuvering. For example, Support Team cards like Engine Techs and Nav Team can both be used to get extra turning ability, but some ships can use them more effectively than others. Engine Techs is better placed on a Gladiator-class Star Destroyer to take advantage of that ship's "II" yaw value at speed one. Nav Team can help a Nebulon-B frigate execute a dramatically sharper turn when it resolves a well-planned command using both the dial and a command token.
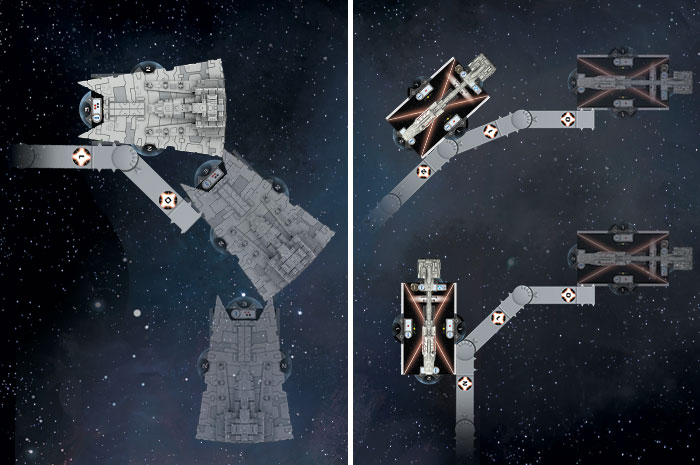
It's a Trap!
Finally, if you can help it, you don't want to be completely predictable. Much of Armada lies in anticipating your opponent's plans and then altering yours to set the trap, instead of falling into it.
It's generally good to point your ships at the enemy and hold to your plan. Still, every game has certain decision points where a ship can make a tactical change to its speed or course that can shape the rest of the game. For example, a fleet with several Nebulon-B frigates could begin its game by creeping toward the enemy fleet at speed one, focusing its attacks on one enemy ship. Then, on the third round, those frigates could each reveal and spend a saved token to accelerate to speed three, with a plan to speed past the damaged enemy ship, destroy it with rear arc shots and turn to score on the station objective on rounds four and five.

Learning how to plan dynamic maneuvers several rounds in advance can leave your opponent guessing as to your real plan, and leave you with room to spring a surprise that will score you enough points to win.
In the end, the more of these principles you can apply to your Armada matches, the more you'll have mastered one of the game's fundamental skills, and the better you'll be able to position yourself for success.
Fighters Coming In
Maneuvering your capital ships may be one of the most important skills to master in Armada, but there's more to the game than its capital ships and objectives. Any fleet admiral who doesn't heed the threat posed by squadrons of enemy fighters is bound toward defeat. But to what end should you invest in your own fighters? Developer Max Brooke explores this question, as well as other questions about how you might best make use of the squadrons you deploy, in our next Armada strategy article!
_________________
Farlander- Mitglied der Ehrengarde
Re: Star Wars Armada - NEWS !!! ONLY !!!
Barlmoro Do 24 Dez 2015, 09:47
Bomber Wings and Fighter Screens
An Armada Strategy Article by Developer Max Brooke
"Squad leaders, we’ve picked up a new group of signals. Enemy fighters coming your way."
–Star Wars: A New Hope
The first Championship-level event for Star Wars™: Armada is nearly upon us, and fleet admirals throughout the galaxy are transmitting coordinates for their ship captains to rendez-vous at Gen Con Indy. Engineering teams are double- and triple-checking their ships' engines, shields, and weapons systems. Nav teams are plotting their courses. And hundreds upon hundreds of skilled fighter pilots are donning their flight suits, aware that the dogfights they're about to wage may prove to be their last… but may also prove critical to a decisive victory and a key turn in the Galactic Civil War.
Over the last couple of weeks, the game's developers have shared some fundamental strategy lessons designed to help players prepare for tournament-style play. Two weeks ago, developer Sam Stewart reminded us of the "Many Paths to Victory." Then, last week, producer Michael Gernes then shared some tips for developing your positional skills in his article,"Move into Attack Position." Today, developer Max Brooke continues the series with a focus on the tactical importance of the game's squadron battles.
[/size]

Developer Max Brooke on Winning Your Squadron Battles
As a game of capital ship battles, Star Wars: Armada focuses on titanic clashes between behemoths in the depths of space, surrounded by clouds of screaming starfighters. However, the deadly duels between those squadrons of starfighers also comprise a small, but important part of the battles that Armada emulates.Although, it's technically possible to launch a fleet without squadrons, I wouldn’t leave home without at least a small defensive force. Remember, on top of the raw damage that uncontested bomber squadrons can inflict, a capital ship’s most important protective resources – its defense tokens – are substantially less effective against the numerous, small hits that squadrons inflict.
[/size]
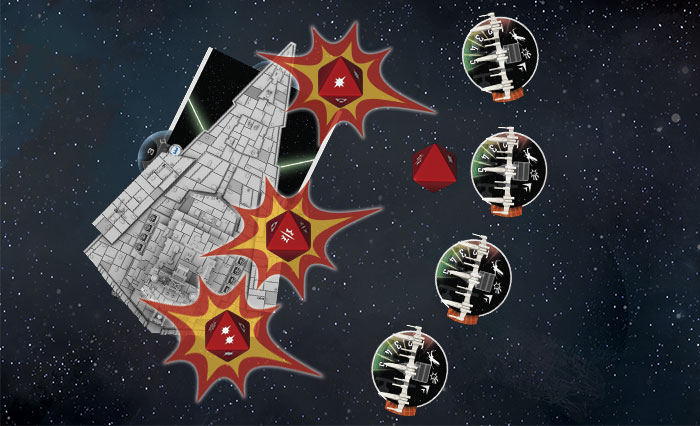
Evade tokens are usually useless against squadrons’ close-up attacks, and even the redoubtable Brace token that halves the damage from a single attack is little consolation against five separate hits for one to two damage each. Whether you send them on the offensive or use them exclusively to defend, squadrons play an important role in a balanced fleet.
Although squadron composition is a complex problem, it starts with one simple question: Do you want your squadrons to focus primarily on sinking enemy capital ships or on preventing enemy squadrons from destroying your own capital ships? Knowing the main role you want your squadrons to play can help you tailor your choices to serve that strategy, and decide whether you want to construct a bomber wing or a fighter screen.
Bomber Wings
If you want your squadrons to focus on dealing damage to enemy ships, you’ll want to construct a bomber wing. Typically, this means including a group of squadrons that possess the Bomber keyword, which allows them to inflict critical hits on capital ships, plus some other squadrons to help them carry out their deadly mission. If you take a bomber wing, you’re committing to inflicting some damage on enemy capital ships with these bombers. You’ll still be relying on your capital ships to do some damage to enemy capital ships, but you’ll also need to spend multiple commands getting your squadrons into position to strike.The fleet-building rules limit the construction of your bomber wing to no more than one-third of your total fleet points, but that still leaves room for a lot of different compositions. Nonetheless, there are a few squadrons that stand out for use in bomber wings. For the Rebels, Y-wing Squadrons and B-wing Squadrons are the most reliable bomber options, though X-wing Squadrons can also work.
[/size]
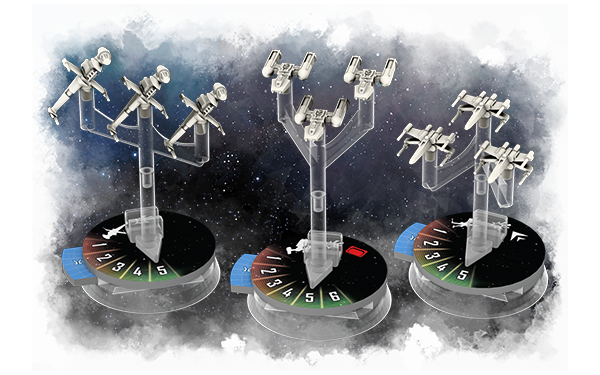
The Rebel squadrons with the Bomber keyword: B-wing, Y-wing, and X-wing.
For the Imperial side, TIE Bomber Squadrons are the best anti-ship option by far. TIE Advanced Squadrons lackBomber, but they can still inflict some damage with one black die for their anti-ship attack, which becomes even more effective when you use their considerable speed to reach vulnerable hull zones.
In order to pose a credible threat to your opponent's capital ships, you'll need your bomber wing to number several squadrons. In games of 300 fleet points, it's fairly reasonable to purchase sixty to seventy-five points of bombers. Aces are an appealing option, especially Keyan Farlander and Major Rhymer , but make sure you still have enough standard bombers to get the job done. Of course, you also need to make sure that your bombers survive long enough to get their job done, and this is where your choices get more complex. Flying tough squadrons with theEscort keyword alongside your bombers not only makes them much harder to kill, but also help them punch through fighter screens in time to fire at enemy ships. Darth Vader and Luke Skywalker are obvious choices as escorts for a bomber wing, as both are nearly as deadly against capital ships as they are against other squadrons, but Soontir Fel can also perform admirably in this role, shredding any fighters who ignore him to attack your TIE Bomber Squadrons.
A basic bomber wing might look like this:
[/size]

- Major Rhymer (16)
- TIE Bomber Squadron (9)
- TIE Bomber Squadron (9)
- TIE Bomber Squadron (9)
- TIE Advanced Squadron (12)
- TIE Advanced Squadron (12)
[size]
Total Fleet Points: 67
At sixty-seven of your 300 fleet points, this bomber wing constitutes a substantial investment, but not so much that it seriously limits your options for capital ships and upgrades. Still, you’ll be relying on it to deal some real damage, so you may consider upgrading your fleet with Expanded Hangar Bay and Admiral Chiraneau to lend more effective support to your bombers. In battle, you’ll want to use this bomber wing’s high speed and the expanded range that Major Rhymer grants it to dart in, smash an unprotected enemy capital ship, and then move on to another target before your foes can pin it down.
Fighter Screens
On the other hand, a fighter screen consists of squadrons designed to intercept enemy squadrons, engage them, and keep your capital ships safe. Fighter screens aren't meant to inflict major damage on enemy ships, so if you take a fighter screen to battle, you're going to need your capital ships to win their exchanges with enemy ships. As for your fighters, they need to balance killing power with mobility, and you want to do this as economically as possible in order to keep the focus on your capital ships. At 300 fleet points, it makes sense to commit anywhere from twenty-four to fifty points to your fighter screen.The goal is to engage enemy bombers, and while destroying enemy squadrons can be a good way to earn victory points, your fighters don't need to destroy enemy fighters so long as they keep your ships from suffering bomber damage. Squadrons with a high speed rating can be key, here, as your squadrons must be able to either pounce on enemy squadrons before they attack or rapidly get into position to ward off enemy bombing runs entirely.
Imperial players will find that a swarm of TIE Fighter Squadrons and TIE Interceptor Squadrons will serve as a great fighter screen. On the Rebel side, A-wing Squadrons pair their tremendous speed with the Counter ability, which lets them menace any enemy fighter squadrons who might attack them. X-wing Squadrons can work well in this role too, though, as they are tougher than A-wings and hit harder when they attack. Additionally, ace pilots really shine in fighter screens; the extra durability their defense tokens gives them makes them that much better at pinning down enemy forces for multiple rounds, and many have some truly lethal anti-squadron abilities. Tycho Celchu , Wedge Antilles , "Howlrunner," and "Mauler" Mithel all stand out as great choices to lead a fighter screen.
A basic fighter screen might look like this:
[/size]

- Tycho Celchu (16)
- A-wing Squadron (11)
- A-wing Squadron (11)
- A-wing Squadron (11)
[size]
Total Fleet Points: 49
A force like this gives you a lot of flexibility, thanks to its speed and the Counter ability. It can lurk behind your ships and wait for enemies to come within its astounding striking range. Alternatively, it can zoom out to position in front of your ships, daring enemies to launch the first strike, or even split into two pairs to cover multiple angles of attack. Even if they strike with their escorts in order to pin down your squadrons, leaving their bombers free, Tycho’s special ability leaves him leave free to chase the bombers. Position denial tactics can be especially effective against Major Rhymer and his cohort, provided that you can guess where your opponent wants to send them.
Getting the Most from Your Squadrons
Of course, no plan survives contact with the enemy. Squadron strategy might start during list-building, but it certainly does not end there. Deploying your fighter squadrons properly is also very important, as is carefully plotting your squadron commands and maneuvering your ships to keep them within medium range of your squadrons when the time comes to issue those commands.Squadrons can deploy anywhere within Distance "2" of one of your capital ships, which means that they can go behind your ships, alongside them, or even in front of them, further toward the center of the battlefield than your ships can deploy. However, as you deploy your squadrons, you want to keep a few factors in mind, such as which squadrons your opponent is fielding, who has initiative, and the overall board setup.
[/size]

Your fighter squadrons can deploy anywhere within Range "2" of your ships… which means they can even deploy outside of the deployment zone in order to pounce upon your opponent's ships and squadrons.
Perhaps the most important question at this stage is which squadrons your opponent is fielding.
[/size]
- If your opponent is heavy on bombers, you need to consider how to counter them – or if your own squadron complement is mostly bombers, you may simply want to ignore them and instead start in a race to destroy capital ships.
- If your opponent is running mostly anti-fighter squadrons and you have a core of bombers, you must decide if you want to try to outmaneuver their screen, break through it, or split your forces to pin the screen down elsewhere while your bombers attack.
- If both of you brought fighter screens, you can try to win the fighter battle for the victory points it yields or, if you find your starfighters outclassed or outnumbered, you might want to try to have your squadrons fight conservatively, so as not to give up victory points to the enemy.
[size]
Meanwhile, the farther in front of your ships your squadrons are deployed, the sooner your enemy is going to be able to engage them. Thus, deploying in front of your capital ships is a risky move for a bomber wing, but it can pay out, especially if you have initiative and can launch your bombers directly into the thick of their fleet within the first few turns. When you’re using a fighter screen, placing your squadrons ahead of your capital ships can force your opponent to make a hard choice – fly directly into your defenders and hope to break through, or wait and try to maneuver around.
[/size]

Position denial can be just as effective a means to protect your capital ships from bombers as destroying those bombers. This tactic is especially effective with A-wings and TIE interceptor Squadrons, thanks to their Counterkeyword.
If you don’t want to expose your squadrons to as much risk early on, you can place them alongside or behind your capital ships. This also minimizes the risk that you will overlap your own fighters, allowing your opponent to place them in contact with the capital ship’s base in the position of his choice. However, a conservative deployment comes with its own risks, namely that you wait too long to engage the enemy.
[/size]
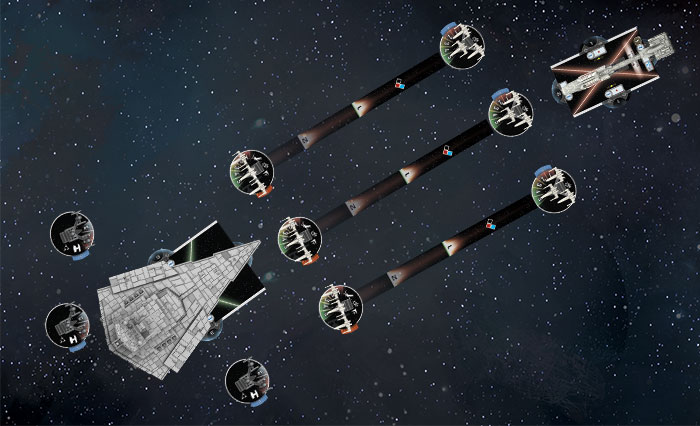
Here, the Imperial player kept his TIE Fighter Squadrons out of harm's way by deploying them behind his Star Destroyer, but by doing so, he left his Star Destroyer exposed to a round of X-wing Squadrons and their bombing runs.
Once you have deployed your capital ships and squadrons, you’ll plot your commands, which should most likely include some squadron commands. If you’re relying heavily on a bomber wing to inflict damage, or if your opponent has a menacing force of bombers arrayed against you, you should plot your squadron command for the round during which you think engagements will happen and maybe even the round prior. Even if you end up with a squadron command earlier than you need it, saving the squadron token to activate an extra squadron or even a single squadron can be helpful as the battle progresses.
Initiative should also factor into your considerations. If you have initiative, you’ll get to activate one of your vessels first each round, meaning you'll have a chance to move your squadrons before your opponent does, provided that you have a squadron command plotted. If you don’t have initiative, you’ll need to try to predict your opponent’s decisions so that your squadrons are already in position for the ensuing fighter battles.
It's important to have your squadron commands plotted at the right time because even though you can choose to activate your squadrons only during the squadron phase, squadrons activated with commands are dramatically more effective. This is especially true during the first few rounds while squadrons are in striking range of capital ships and each other, but before they become trapped in engagements.
Using your commands to activate unengaged fighter squadrons allows them to both move and attack, allowing you to shape the upcoming conflicts, rather than simply react. A skilled squadron tactician can find gaps that let his interceptors tie down numerous enemy ships at once, or even reach specific targets – such as bombers – without engaging their escorts. Even if your opponent’s formation is impenetrable, moving first means denying your enemy the same chance to find openings in your own squadron formation.
[/size]
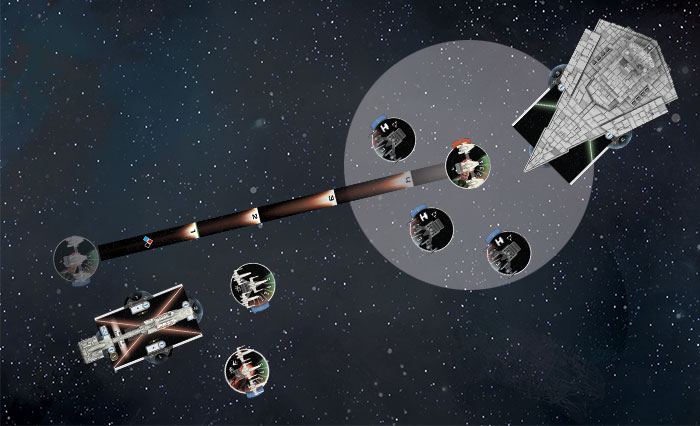
A Rebel player takes advantage of his A-wing Squadron's exceptional speed to fly past a screen of three TIE Fighter Squadrons, engaging them all and freeing his X-wing Squadrons to take bombing runs against the Star Destroyer.
No matter what squadrons you take to battle or how you choose to activate them, your fighter battles are an extremely entertaining part of Armada, and add a great number of layers to the larger capital ship conflicts that they help to decide.
[/size]
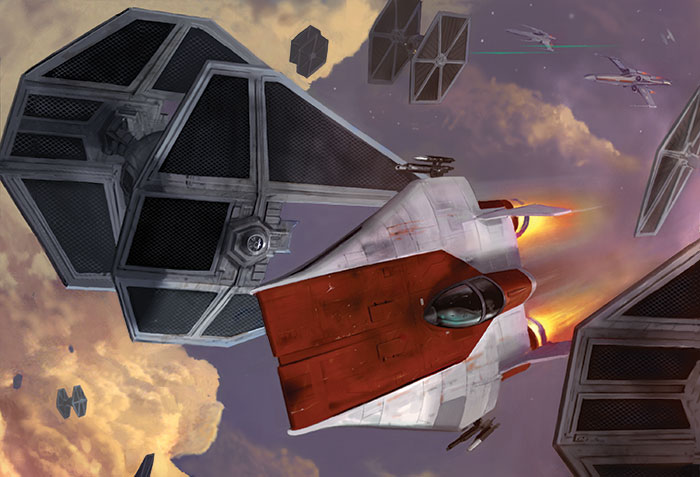
Lock S-foils in Attack Position
In Armada, though your squadron battles take place in the shadows of the larger clashes between capital ships, if you do a good job of intergrating your squadrons into your overall plan, there's no denying their potential impact. How, then, will you integrate squadrons into your fleet? Will you take a bomber wing or a fighter screen? Or will you focus on versatile ships like the X-wing and the TIE advanced so that your fighters can play multiple roles?As we look forward to the North American Championships at Gen Con Indy and the build-up toward the World Championships in November, finding the most effective way to win the fighter battle may not win you the war, but it will certainly help!
[/size]
Barlmoro- Boarding Team Mos Eisley
Re: Star Wars Armada - NEWS !!! ONLY !!!
Barlmoro Sa 23 Apr 2016, 09:40
Take the Station
Download a Free Multiplayer Scenario for Star Wars™: Armada
The miniatures game of epic space battles in the Star Wars universe, Star Wars™: Armada thrusts you into the role of fleet admiral with either the Galactic Empire or Rebel Alliance. You and your opponent assemble your fleets, command your ships, and battle for the fate of the galaxy.
Now, the developers have added more ammunition to your Armada battles with the introduction of a new multiplayer scenario, Take the Station (pdf, 4.4 MB). While the game's core identity remains firmly rooted in its strategic, head-to-head battles, Take the Station explores new territory, allowing you to enjoy the clashes between capital ships belonging to as many as four different fleets.
An Introduction from the Developers
 Enjoy multiplayer Armada. Download Take the Station (pdf, 4.4 MB).
Why design a multiplayer scenario for Star Wars: Armada? How does your multiplayer experience differ from your classic head-to-head battles? The game's developers address these questions in a short introduction to Take the Station:
"At its heart, Star Wars: Armada will always be a two-player experience. However, when a group of friends gets together, there are times that everyone wants to play the same game, instead of splitting into groups. As fans of many different miniature games, we know that one thing we tend to enjoy are group “megabattles” with multiple participants. And Take the Station was born after we set out to see if the group "megabattle" was something we could introduce to Armada.
"One thing we realized early on was that the alternating ship activation of Armada could, with some minor tweaks, work really well in a game with three or four players. Generally, one of the big problems with a multiplayer game is the downtime as you wait for three other players to finish their turns so that you can go again. However, with each player activating one ship at a time, downtime is substantially reduced. With that in mind, we decided that our first multiplayer scenario would be multiple players competing against each other, not two teams of players working together.
"As we looked deeper into the idea of creating a multiplayer scenario, a few substantial changes stood out.
- First, rotating initiative becomes a must, so that the same player isn’t stuck going fourth every round.
- The scenario is also very different than the usual objectives. We had to design something that would play outside of the normal two player dynamic, so we came up with a scenario where each player had the same goal, but the sooner you accomplished the goal, the greater the reward would be.
- Finally, we decreased the size of each player’s fleet. We wanted to make sure that the playing time for this game wouldn’t balloon substantially, and we also wanted to make sure that all four players had enough room on the game board to maneuver their ships.
"The result is a smaller, fast-paced scenario in which you'll field one or two ships that have to stand alone against multiple foes. In this scenario, you don't find the classic head-to-head engagement between two fleets. Instead, you find a very different experience, and one we hope you enjoy!"
–Sam Stewart, Michael Gernes, and John Shaffer

Recover the Data
Looking for new ways to enjoy your tactical fleet battles? Download Take the Station, gather your friends, and fight for control of the Outer Rim's most valuable intelligence!Then, keep your fleet at the ready for more Wave III previews, strategy articles, and other Armada news!
Barlmoro- Boarding Team Mos Eisley
» Star Wars Armada - Wave IV News
» Star Wars Armada - Wave V News
» Star Wars Armada - Wave VII News
» Star Wars Armada - Wave I News
MosEisleyRaumhafen :: Weitere Star Wars Spiele... :: [Armada] "Flottenbasierte Raumgefechte" :: Armada News
|
|
|